3D printing is fun, fast, and highly effective—but it is more art than science. Trial and error printing is a common experience among users, as prints almost never turn out as expected on their first try. Many things can go wrong in a print, but warping is by far the most common occurrence in 3D printing that delays many projects. This article will help those frustrated with their warped prints by explaining how warping happens and how to prevent it in consecutive projects. Pragmatic steps and avoidable mistakes will also be included to provide real world solutions to this pesky manufacturing defect.
What is 3D Printing Warping?
When a part distorts from its intended shape, it is considered warped. Warping can occur in almost every type of 3D printing, but this article will mainly focus on warping in fused deposition modeling (FDM) printing and similar extruder-type 3D printing, as it is the most common type of 3D printing process and uses materials prone to warping like PLA, PETG, PP, ABS, and other thermoplastics.
Warping can occur at any stage of the print, ruining part quality and wasting valuable time and material. Warping is especially annoying because it shows itself only after cooling, meaning it is too late once it is noticed.
It is important to note that prints can look warped without having experienced true warping. When inadequate support material is used, bridges or voids are too wide, or the model is generally unoptimized for 3D printing, the print will fail and come out looking droopy, messy, or otherwise non-functional. This article is focusing specifically on the phenomenon of warping; to learn more about these kinds of defects and how to prevent them, read our article about designing for 3D printing.
How do I fix a warped 3D print?
Unfortunately, there is no easy way to un-warp a part without causing more issues, especially with prints requiring accurate dimensions. The only possible way to unwarp a 3D print would be re-heating it using a heat gun/hair dryer and trying to nudge it back into shape. This may be possible, but it usually makes more sense to just reprint the part using the warping-prevention measures covered in subsequent sections.
What causes warping in 3D printing?
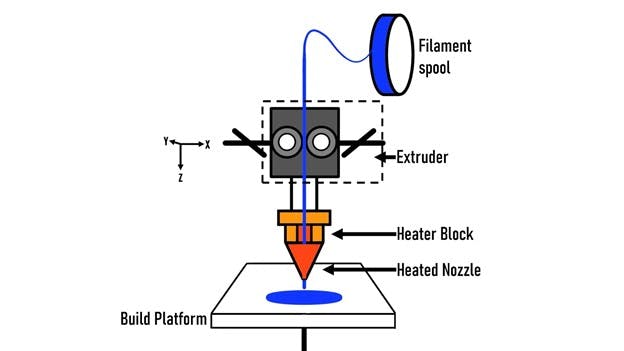
Warping has many sources, but it is generally a side-effect of the materials used in 3D printing—namely thermoplastics. Below in Figure 1 is a basic diagram showing how a printer uses thermoplastic filament like PLA, ABS, PC, PETG, etc. to print parts in a layer-by-layer process:

Figure 1: Basic diagram of extruder-type 3D printers. Notice how the solid filament is heated, changing phases to be printed as layers.
Image Credit: Christian Cavallo Consulting, LLC
As you can see, the filament is extruded through the heated nozzle, changing phase into a liquid (or melts). It then condenses back into a solid (or cools) to form a part layer once it is laid on the build platform. Thermoplastics retain their mechanical properties across multiple phase changes, making them ideal for 3D printing applications; however, they are not exempt from physical effects like expansion and shrinkage during these phase changes. For example, ABS plastic shrinks up to 1.5% when cooled from 446F to ambient temperatures. Uneven heating and cooling between layers are the primary sources of warping, where cooler layers pull on hotter layers and cause them to bend.
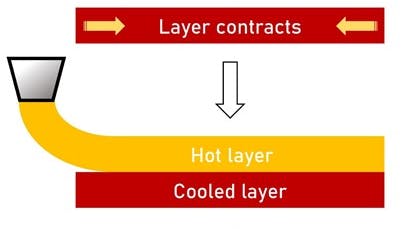
Warping tends to show itself at the base of the print, as the bottom layers have a longer time to cool and are therefore subjected to the effects of all successive layers above it. Figure 2 shows the basic sequence of events that lead to warping:

Figure 2: Basic diagram showing how contraction in layers causes warping.
Image Credit: Christian Cavallo Consulting, LLC
As hotter layers cool on top of already cool layers, they tend to pull up on the bottom layer and cause warping. This effect is especially apparent at the interface between the first layer and the print bed, as the first layer is fixed to it and cannot contract, meaning it will experience the highest curling forces from the next layer. This problem also scales with size- the larger the layers, the stronger the forces warping your print.
A second source of warping can be caused by the above effect, where the first layer of a print adheres well to the build platform but warps the actual print bed with it. This usually happens with large parts on spring steel plates and is mitigated with print beds made of glass or other non-ductile materials. Misalignment of the print bed is also a common cause of warping, where the nozzle is not close enough to the platform and creates a weak connection between the part and the plate. These are rare effects, but if the below tips do not reduce warping, then you should check your print bed for curvature and/or its level.
FREE SLA 3D Printing Design Guide
How do I prevent warping/lifting in a 3D print?
The good news about warping is that it is fixable- given some key preventative measures.
Below are some methods for minimizing 3D print warping. Using a combination of the below tips will give you the best chance at reducing (and hopefully eliminating) 3D print warping.
Temperature Control
Any means of regulating the temperature of the print will reduce warping effects. The easiest way to control temperature is with a heated build plate. This component allows for precise control of the bed temperature underneath the part, keeping the print just below its transition temperature but still hot. A heated build plate equalizes temperature differentials through the 3D print and improves bed adhesion build plate throughout the print. Most filament comes with recommended bed temperatures, for example: a build plate temperature of 60 °C is usually sufficient for PLA, while ABS requires higher temperatures of 80 or 90 °C (depending upon printer, nozzle size, and brand).
Another means of temperature control involves the use of an enclosed build space. An enclosed build space eliminates drafts and air currents while better retaining the heat of the print/build plate. Not all printers come with enclosures though, so you can either build your own enclosure or print a draft shield around the print. An enclosure can be a photography tent, a storage box, an engineered third-party enclosure, or a DIY acrylic/foam enclosure, but they all work to retain heat within the print and reduce air currents across the print.
A draft shield can also be a cheap and effective means of temperature control. Draft shields are essentially walls printed concurrently around a 3D print that will prevent drafts and air currents from cooling a part too much.
The last means of temperature control is through the ambient temperature around the print. Close all doors and windows in the room when a 3D print is on, and if it is still too drafty/cold you can place the printer near a heat source (baseboard, radiator, heat ducts, computers, etc.). Just make sure there is not too much heat- otherwise, you can damage your printer and make a bad situation worse!
Adhesives
Applying adhesive glues to the build plate before printing is probably the easiest (and one of the best) methods of warping prevention. The type of adhesive largely depends on the material, but common adhesives include hairspray, a PVA glue stick, blue painter’s tape, polymer adhesives, or proprietary build plate tape.
Slicer/model settings
Settings in the model and the slicer software can also help reduce warping. Making the first layers thicker will not only adhere to the build plate easier, but the additional material will also make it warp-resistant. A slower print speed and lower nozzle temperature can also reduce warping simply by minimizing temperature differences; however, the print will naturally take longer.
Adding specific features to the model can also prevent warping such as brims, rafts, skirts, and mouse ears. See Figure 4 and 5 below for visual examples of these features, along with their basic descriptions.
Skirt: an outline surrounding the model (but not actually touching the model) meant to prime the nozzle and even out material flow (a in Figure 4).
Brim: A single/ few layers of material attached to the edge of the 3D print’s base meant to counteract pulling forces on the initial layers and increase bed adhesion (b in Figure 4).
Raft: A thick layer of material that serves as a base for the print, creating better grip on the build plate and removing initial layer warp effects from the part.
Mouse ears: Thin circular layers placed near the corners of a 3D print to reduce warping while conserving material (also sometimes referred to as brim ears). Mouse ears are less wasteful, easier to add, but are more targeted.
Finally, altering the infill density of voids can help warping. Denser infills (such as a and d in Figure 6) will impart stronger pulling forces than less dense infills.
Printer Maintenance
The last way to avoid warping is to ensure your printer is clean and calibrated. Before every print, you should use a microfiber cloth on the build plate with either some ammonia-based cleaner or isopropyl alcohol. This will remove previous adhesive, grime, and grit that may make the print less sticky.
Check the fan speed in the printer settings to ensure it remains off/slow during the first few initial layers, or for the whole print if using high temperature filaments. As previously mentioned, also make sure that the build plate is leveled and un-warped. Finally, calibrate the extruder head so that its Z-coordinates are adjusted to prevent unnecessary layer cooling—some newer 3D printers come with level sensors that self-adjust, making this step much simpler.
Summary
This article presented an understanding of what 3D print warping is and how to prevent it. We hope this brief guide helps increase part quality and reduce the sources of headaches from your design process.
Xometry provides a full range of 3D printing services to support all of your custom part needs. Visit our website to view our capabilities or to receive an instant quote on 3D printed custom parts.
To learn more about 3D printing, review our Ultimate Guide to 3D Printing and learn more about the pros and cons of this manufacturing technology.
Disclaimer:
The content appearing on this webpage is for informational purposes only. Xometry makes no representation or warranty of any kind, be it expressed or implied, as to the accuracy, completeness, or validity of the information. Any performance parameters, geometric tolerances, specific design features, quality and types of materials, or processes should not be inferred to represent what will be delivered by third-party suppliers or manufacturers through Xometry’s network. Buyers seeking quotes for parts are responsible for defining the specific requirements for those parts. Please refer to our terms and conditions for more information.
Sources:
- How to fix warping – Ultimaker Support
- 3D Print Warping (PLA, PETG, ABS): 3 Easy Fixes | All3DP
- DIY 3D Printer Enclosure: 10 Cheap & Easy Solutions | All3DP
- 3D Print Warping. Easy Fixes and Ways to Prevent It! (m3dzone.com)
- Warping in 3D Printing | Full Guide with Causes & Solutions (the3dprinterbee.com)
- Warping of bottom of print - 3D Printing Stack Exchange
- How to print with Ultimaker PLA – Ultimaker Support
- How to print with Ultimaker ABS – Ultimaker Support
- Suggestion on improving the draft shield - ABS no warping even on blue tape - Ultimaker Cura - Ultimaker Community of 3D Printing Experts
- Skirt vs Brim vs Raft; When to use them! – 3D Solved

