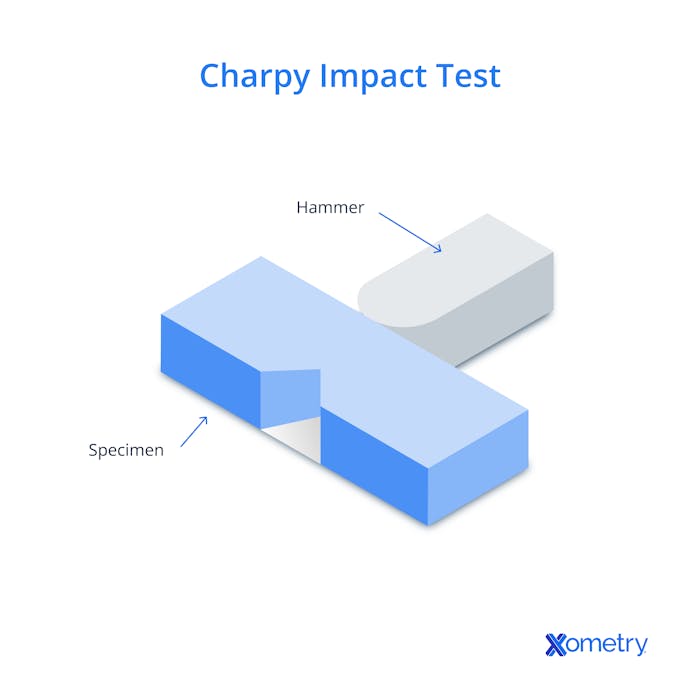
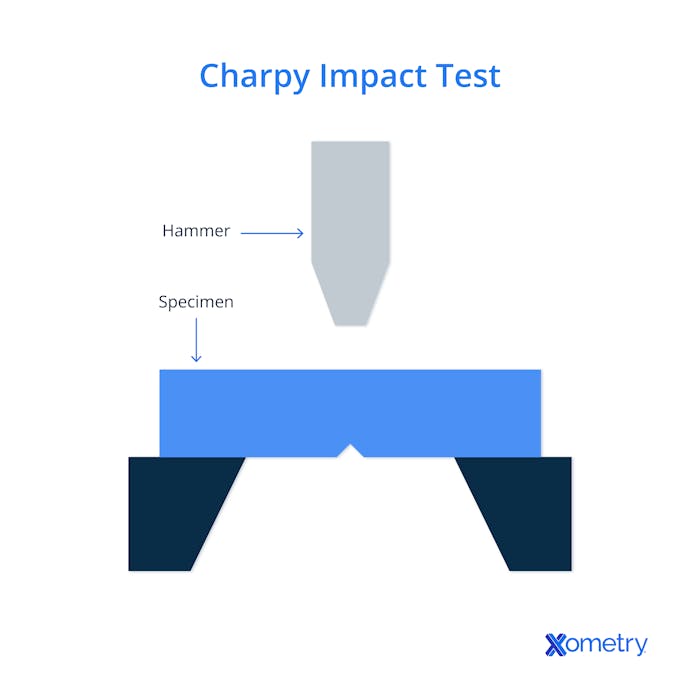
The Charpy impact test was first developed in the 1900s to advance the understanding of why materials fail prematurely. The Charpy test determines how much energy a material absorbs during fracture, known as impact energy, and is used to assess the Charpy impact strength of a material. The test is comparative, which means that the impact strengths of various materials are compared with each other, provided they were tested using the same standard. The Charpy impact test procedure involves striking a notched sample with a swinging pendulum. The height of the pendulum before and after the impact is used to determine how much energy was absorbed by the sample. The test helps to assess notch toughness, which indicates a material's resistance to fracture at the location of the notch.
The Charpy Impact Test is a method used in material testing to measure impact strength, which answers the question, What is Charpy test?, by determining how much energy a material absorbs during fracture. The energy absorbed during the test is measured by the height difference before and after impact, and the result depends on the characteristics of the Charpy impact test specimen.
What Is the Charpy Impact Test?
The Charpy Impact Test is used to measure a material's ability to absorb energy during fracture. The Charpy Impact Test is performed by striking a notched specimen with a swinging pendulum. The amount of energy absorbed during the impact is determined by the height difference before and after the swing. The test aims to assess a material's impact strength, specifically its resistance to brittle fracture under high strain rates. The Charpy impact test is essential for understanding how materials perform in real-world conditions (extreme temperatures or under sudden impact). The Charpy test measures the toughness of materials by testing their response to sudden forces.
The impact test definition involves comparing the energy absorbed by different materials under standardized conditions.

What Is the History of the Charpy Impact Test?
The history of the Charpy impact test dates back to the early 20th century, when it was developed to understand material failure under sudden impact better. The Charpy impact test was invented by George Augustin Albert Charpy in 1901. The test was created to discover why machines (steam boilers, steam engines, and military armaments) were failing prematurely. Charpy improved upon the pendulum-based approach first developed by S.B. Russell. He discovered that adding a notch to the sample helped improve the accuracy and sensitivity of the test. The test was named after Charpy, as he was responsible for various standardization efforts and technical improvements.
What Is the Importance of the Charpy Impact Test?
The importance of the Charpy Impact Test is that it provides valuable insights into the material's ability to withstand sudden forces or impacts. The test is necessary in materials engineering because it helps determine the toughness and reliability of materials in environments subject to rapid loading or temperature fluctuations. Understanding the Charpy impact strength of printed materials ensures that printed parts endure real-world stresses without failing in 3D printing. The test plays a role in mechanical design, where materials must be chosen for their ability to resist fracture under unexpected loads. Charpy impact testing evaluates notch toughness, which measures a material's ability to resist crack propagation at the site of a notch, making it essential for selecting materials for applications where failure leads to catastrophic consequences.
In mechanical design: the Charpy test is a vital tool for assessing a material's resistance to crack propagation under sudden, localized stress. Engineers must verify that a material possesses sufficient notch toughness to absorb energy through plastic work, as this capacity is the primary safeguard preventing minor surface defects from escalating into catastrophic structural failure.
How To Calculate Charpy Impact Test?
To calculate the Charpy Impact Test, there are four steps to follow. First, set up the test by securing the Charpy impact test specimen in place under the pendulum. Second, release the pendulum and allow it to strike the notched specimen. Third, measure the height of the pendulum before and after the impact to determine how much energy was absorbed. Lastly, use the Charpy impact test formula to calculate the energy absorbed by the specimen, which is the difference in potential energy minus the energy losses due to friction and air resistance. It is done using the impact test formula, which includes the mass of the pendulum and the height difference, while accounting for energy losses due to friction and windage.
What Is the Formula for the Charpy Impact Test?
The formula for the Charpy Impact Test is used to calculate the energy absorbed by the specimen during the impact.
The impact test formula is shown below.
E = mgΔh
E is the energy absorbed by the specimen (in joules), m is the mass of the pendulum (in kilograms), g is the acceleration due to gravity (9.81 m/s²), and Δh is the height difference of the pendulum before and after the impact (in meters).
For example, a pendulum with a mass of 1.5 kg swings from a height of 2 meters and is lowered to 1 meter after striking the specimen.
The formula is shown below.
E = 1.5 ⋅ 9.81 ⋅ ( 2 - 1 )
E = 1.5 ⋅ 9.81 ⋅ (1) = 14.715 J
E = 14.715 J
The specimen absorbed 14.715 joules of energy during the impact. The Charpy impact test determines the absorbed energy, typically expressed in Joules, while impact strength is often calculated as energy per unit area (J/cm2 or kJ/m2).
What Is the Unit for A Charpy Impact Test?
Charpy impact test results are measured in joules, which is the SI unit for energy. The unit is the amount of work performed when a 1-Newton force is exerted over a distance of 1 meter. The value is used to calculate the impact energy in J/m2 by dividing the joule value by the sample's cross-sectional area at the sample notch.
What Are the Step-by-Step Procedures of Charpy Impact Testing?
The Step-by-Step Procedures of Charpy Impact Testing are listed below.
- Specimen Preparation: Begin by cutting the material specimen into the required dimensions, a standard rectangular shape, ensuring it is free of any surface defects. The specimen must be positioned in the testing machine with the notched side facing away from the swinging pendulum. Proper specimen preparation is essential for accurate results in the Charpy test procedure.
- Notch Orientation: The notch must be precisely aligned, as its location and orientation affect the results. The notch is placed at the center of the specimen and must face away from the direction of the impact. Correct notch orientation is essential for testing the material's Charpy impact test procedure.
- Pendulum Striking: Release the pendulum from a known height so that it swings down to strike the notched specimen. The force applied to the specimen during impact causes it to fracture, and the pendulum’s height decreases accordingly. The step is part of the impact test procedure used to simulate a sudden force on the material.
- Energy Measurement: Measure the height difference of the pendulum before and after striking the specimen after the impact. The energy absorbed by the specimen is calculated using the height difference, mass of the pendulum, and gravity. The step concludes the Charpy impact test procedure, determining the material’s toughness and resistance to impact.
Which Machine Is Used in Charpy Impact Testing?
A Charpy impact testing machine is used to test the impact strength of a sample. The machine is relatively simple and works by swinging a pendulum into a sample to fracture it. The energy absorbed by the sample is read from a dial on the machine.
The machine is relatively simple and works by swinging a pendulum into a sample to fracture it. The energy absorbed by the sample is read from a dial on the machine.
What Is the Charpy Impact Test Standard?
The Charpy impact test standard is defined by specific guidelines to ensure consistency and reliability in testing procedures. The most recognized standards are ASTM E23 and ASTM D6110. ASTM E23 is the standard used for the testing of metallic materials, providing the methods for measuring impact properties of metals (specimen preparation, testing procedures, and equipment requirements). ASTM D6110 applies to plastics and outlines the methods for determining the impact strength of polymer materials using the Charpy test. ASTM E23 and ASTM D6110 are essential in ensuring that the test results are accurate and comparable across different materials and testing conditions.
What Is the Temperature for A Charpy Impact Test?
The temperature for Charpy impact testing is 23 °C. However, these tests are performed at many temperature ranges to plot the materials' ductile-to-brittle transition temperature.
What Are the Two Types of Charpy Impact Test Results?
The Two Types of Charpy Impact Test Results are listed below.
- Quantitative Results: Quantitative Results provide measurable data, expressed in joules, representing the amount of energy absorbed by the specimen during the impact. The value is used to determine the material's charpy impact strength and its ability to resist fracture under stress. Quantitative results help compare different materials in terms of toughness and impact resistance.
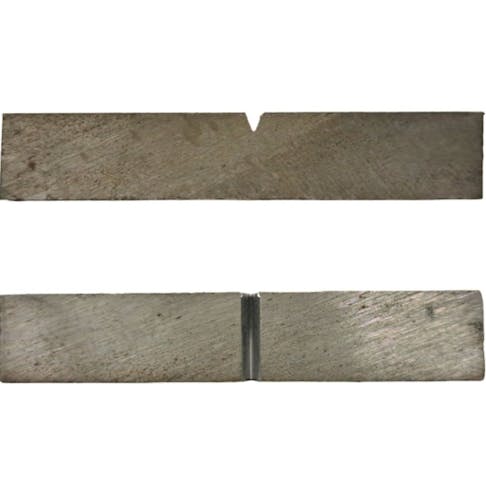
- Qualitative Results: Qualitative Results offer insights into the material's behavior, such as whether it fractures in a brittle or ductile manner. They are observed visually after testing and provide a description of the fracture surface (whether it shows signs of plastic deformation/lateral expansion or a crystalline, flat surface). Charpy impact test procedure helps in obtaining types of results, offering a complete understanding of material performance under impact.
1. Quantitative Results
Quantitative results is data based on numerical values. The quantitative data is normally the energy absorbed during the fracture of the sample in the Charpy impact test. The Ductile-to-Brittle Transition Temperature (DBTT) is estimated by testing the multiple samples at multiple temperatures to see where there is a drastic increase in required impact energy.
The Charpy impact test formula is shown below.
E = m g (h₁ − h₂)
Charpy V-Notch Testing: Why Is It Important in Charpy Tests?
Charpy V-Notch testing is important because the V-shaped notch creates a controlled stress concentration that forces fracture to begin at a precise location, allowing accurate measurement of impact toughness. The Charpy V notch testing ensures that energy absorption is evaluated under repeatable conditions during sudden loading. A V notch test reveals how efficiently a material resists brittle failure when exposed to high-speed impact. A notch test standardizes crack initiation so absorbed energy values remain comparable across different material samples. The Angulo de Charpy defines the exact notch angle that controls stress intensity, which directly affects the accuracy and consistency of impact toughness measurement.
Charpy Impact Test Diagram: How Is It Represented?
The Charpy impact test diagram is presented by the following steps listed below.
- Present the Charpy Impact Test Diagram layout. A Charpy impact test diagram shows a rigid support frame with a pendulum mounted at a fixed height above the specimen. The design illustrates how gravitational potential energy converts into impact energy at the strike point.
- Show the arrangement in a Charpy Test Diagram. The Charpy test diagram displays the test specimen resting horizontally on two anvils with a defined span between supports. The notch faces toward the pendulum, so the fracture initiates at the highest stress concentration during impact.
- Depict the operation of a Charpy impact tester. The Charpy impact tester illustration traces the pendulum arc from release to specimen contact. The difference between the initial and rebound height represents the energy absorbed during fracture.
- Illustrate the energy measurement stage. The final diagram stage shows a mechanical scale or digital display connected to the pendulum axis. The measured energy loss directly represents the material’s impact toughness under sudden loading.

What Are the Factors Affecting A Charpy Impact Test?
The factors affecting a Charpy Impact Test are listed below.
- Yield Strength: Yield strength affects material stiffness, higher strength reduces deformation before breaking.
- Notch: Notches create stress points, and grooves guide fracturing.
- Temperature: Temperature influences brittle or ductile behavior, changing energy needed to fracture.
- Fracture Mechanism: The fracture mechanism shows how the material separates under impact, reflecting its internal structure’s resistance to force.
1. Yield Strength
The material's yield strength increases when the impact energy decreases. Materials with higher yield strength have lower toughness. Materials that plastically deform before ultimate failure are considered to be tougher. Yield strength and higher yield strength are factors affecting a Charpy Impact Test, which creates a stiffer response that reduces the amount of energy absorbed during impact.
2. Notch
The notch introduces a controlled stress point that directs the fracture path and influences the measured toughness. The V-notch specimen is used when the material is brittle, and a U-notch specimen is used when the material is ductile. The U-notch specimen has a higher stress concentration factor than the V-notch specimen. It must be noted that the notches must be precisely the same to get accurate results that compare with past tests.
3. Temperature
Temperature alters material behavior by shifting the balance between brittle and ductile responses during impact loading. The Charpy impact tests are typically performed at 23 °C. However, higher and lower temperatures are used to plot a curve representing a material’s ductile-to-brittle transition behavior. Higher temperatures increase impact strength.
4. Fracture Mechanism
The fracture mechanism determines how a material separates under sudden force and defines the amount of energy required to complete the break. The two fracture mechanisms are cleavage, which is common in brittle materials, and microvoid coalescence, which is more common for ductile materials. The materials that fracture via the cleavage fracture mechanism have lower impact energy than materials that fail via microvoid coalescence.
Is the Charpy Impact Test Important in 3D Printing?
Yes, the Charpy impact test is important in 3D printing. Performing Charpy impact tests on 3D printed samples helps engineers determine the impact strength of various 3D printing materials, considering that some technologies print parts with anisotropic properties. Testing samples with different print geometries helps engineers understand how to optimize their designs for impact strength. The impact test of Charpy is important in 3D printing because the method provides a clear measurement of how a printed material absorbs energy during sudden loading. For more information, see our guide on Everything You Need to Know About 3D Printing.
Check out our Technical Datasheet Glossary to learn more about different material properties.
Frequently Asked Questions About Charpy Impact Tests
What Is the Charpy Impact Test Result in High-Strength Material?
The Charpy impact test result for a high-strength material (tungsten) has a comparatively low impact strength, as it is highly brittle.
What Is the Charpy Impact Test Result in Low-Strength Material?
The Charpy impact test result in a ductile material typically shows higher toughness, as the material absorbs more energy through plastic deformation before fracturing.
What Is the Difference Between Charpy Impact Test and IZOD Impact Strength Test?
The difference between the Charpy impact test and the IZOD impact test is how the sample is secured. The sample is supported on two sides, and the pendulum strikes the middle of the sample for the Charpy test. The sample is supported solely on one side (in a cantilever configuration), and the pendulum strikes it on the opposite side, in the IZOD test. The difference in Charpy Impact Test vs. IZOD Impact Strength Test comes from the specimen orientation, the notch direction, and the way the pendulum applies force during impact.
The difference between IZOD and Charpy test comes from the orientation of the specimen, the direction of the notch, and the way the pendulum applies force during impact. An IZOD and Charpy test comparison shows that the Charpy method uses a horizontally supported bar with the notch facing away from the pendulum, and each setup directs the fracture through a tension‑loaded region. The IZOD method uses a vertically clamped bar with the notch facing the pendulum, and each configuration channels the strike directly into the stress‑concentrated groove. The Charpy and IZOD test difference reflects how each arrangement produces a distinct fracture pattern, and each pattern reveals how a material responds to sudden loading under two different structural conditions.
Disclaimer
The content appearing on this webpage is for informational purposes only. Xometry makes no representation or warranty of any kind, be it expressed or implied, as to the accuracy, completeness, or validity of the information. Any performance parameters, geometric tolerances, specific design features, quality and types of materials, or processes should not be inferred to represent what will be delivered by third-party suppliers or manufacturers through Xometry’s network. Buyers seeking quotes for parts are responsible for defining the specific requirements for those parts. Please refer to our terms and conditions for more information.


