Compression set testing helps you choose the right material for applications where constant compression and recovery are required. If a material has a high compression set, it may lose its shape and fail over time, leading to problems like leaks in seals or gaskets. By testing the compression set, you can avoid choosing materials that won’t hold up over time, saving you from costly failures and maintenance issues. Let’s look at exactly what compression set is and how to do the test.
What is a Compression Set?
In materials science, a compression set measures how much deformation or height loss a material experiences after being subjected to a particular compressive force for a given time. It tells you how well the material can return to its original shape once the compressive force is removed. This is especially important for materials used in products that are constantly being compressed and need to regain their shape. In simple terms, it's the amount of permanent deformation that stays after the material is compressed. A common test procedure for calculating the compression sets of rubber and rubber-like materials is ASTM D395.
Different polymers have different abilities to recover from compression. If a material has a high compression set, it’s less resilient and will be more likely to stay deformed under pressure. This makes it unsuitable for applications that need long-term compression resistance. If its compression set is lower, it’ll be more resilient and recover better, making it a good choice for applications where the material will repeatedly be compressed, such as in seals, O-rings, seals, and gaskets.
Higher temperatures tend to cause more deformation and less recovery. Also, the longer the material is compressed, and the more stress or strain it endures, the more deformation it could experience. A material’s compression set can be improved with fillers or by adjusting the curing process.
We’ve put some common manufacturing materials in the table below with their approximate compression sets, as well as their suitable applications.
| Material | Approx. Compression Set | Applications |
|---|---|---|
Material Silicone Rubber | Approx. Compression Set 20–40% | Applications Gaskets, seals, O-rings, medical devices, automotive parts |
Material Nitrile Rubber | Approx. Compression Set 25–50% | Applications Seals, gaskets, fuel hoses, O-rings, automotive and industrial applications |
Material Polyurethane | Approx. Compression Set 20–40% | Applications Seals, gaskets, cushioning materials, wheels, industrial equipment |
Material Neoprene | Approx. Compression Set 15–30% | Applications Gaskets, seals, wet suits, electrical insulation, automotive parts |
Material Polyethylene | Approx. Compression Set 5–15% | Applications Packaging, containers, piping, insulation, toys |
Material Polypropylene | Approx. Compression Set 5–15% | Applications Car parts, containers, packaging, textiles |
Material Polyvinyl Chloride (PVC) | Approx. Compression Set 5–20% | Applications Pipes, plumbing, electrical insulation, flooring, medical products |
Material Acrylic (PMMA) | Approx. Compression Set 1–5% | Applications Optical applications, display cases, lighting, car components |
Common Materials and Their Compression Sets
Compression Set Testing
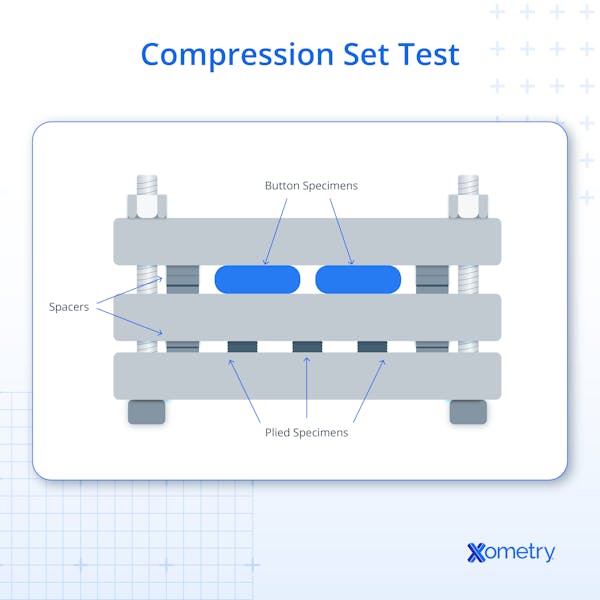
To test the compression set, a material sample is compressed under a specific load for a set time. After the compression, the material is allowed to recover, and then the amount of deformation is measured. The result is expressed as a percentage of the original thickness that remains deformed.
Equipment
To measure the compression set, you’ll need a compression set apparatus. This usually includes a compression platen (a flat surface to compress the sample), weights to apply a specific load, and a micrometer or measuring tool to measure the thickness of the material before and after the test.
Test Types
There are two common types of tests to measure compression set, typically referred to as Compression Sets A and B.
Keys
- H0 = Original height of material
- H1 = Height/thickness of material after a specified compression and time
- H2 = Height/thickness of material after specified compression and time, and subsequent recovery period
- Hn = Material’s height during testing
Compression Set A = [(H0-H1)/H0] x 100%
This test is typically used to compare different materials’ resistance to permanent deformation. The material is compressed under a specific force (usually 1.8 kN) for a set amount of time. After the compression, it’s given 30 minutes to recover. The recovered thickness is measured, and the compression set is calculated using the above formula.
Example
If a material started at 20 mm thick and, after compression, it only recovered to 18 mm, you could calculate the compression set percentage as follows:
[(20 mm - 18 mm) / 20 mm] x 100% = 10%
Compression Set B = [(H0-H2)/H0-Hn] x 100%
This test is used when you need to know how a material behaves when compressed to a specific thickness. The material is compressed to 75% of its original height for a specific time and then allowed to recover for 30 minutes. The recovered thickness is then measured, and the compression set is calculated.
Example
If a rubber sample starts at 20 mm and is compressed to 75% (15 mm), then after recovery, it’s measured to be 18.5 mm, the calculation would be:
[(20 mm - 18.5 mm) / (20 mm - 15 mm)] x 100% = 30%

Understanding the Graph
Compression set graphs help you visualize how a material behaves under different conditions, like temperature, which is important for choosing the right material for specific applications. Compression set graphs typically show a material's deformation changes with varying temperatures. The Y-axis shows the compression set percentage (how much the material stays deformed), and the X-axis is the temperature in Celsius.
As the temperature increases, the material's compression set rises too, meaning it won’t recover as well at higher temperatures. The graph can show this by comparing lines that represent the material’s compression set after being compressed for 24 hours at different temperatures.
FAQs on Compression Set
Is compression set important in 3D printing?
Yes, it is. In 3D printing, the compression set is crucial because it tells you how well the printed material will perform under stress over time. Materials with a high compression set are more likely to permanently deform when compressed, which could affect the integrity of the printed parts. For instance, if you’re 3D printing parts that will be subject to compression (like seals), you’ll want to choose a material with a low compression set to ensure that it keeps its shape and performs well over time.
What’s the difference between compression set and creep?
Compression set refers to the permanent deformation of a material after compression, while creep is the gradual, time-dependent deformation that happens when a material is under constant stress for a long period. Compression set is a one-time deformation, while creep happens over time.
How Xometry Can Help
If you have any more questions about compression set or need help choosing the right material for your project, just reach out to one of our representatives, who would be happy to assist. Xometry also offers so many related manufacturing services like CNC machining, laser cutting, and 3D printing. Get started today by requesting your free, no-obligation quote.
Disclaimer
The content appearing on this webpage is for informational purposes only. Xometry makes no representation or warranty of any kind, be it expressed or implied, as to the accuracy, completeness, or validity of the information. Any performance parameters, geometric tolerances, specific design features, quality and types of materials, or processes should not be inferred to represent what will be delivered by third-party suppliers or manufacturers through Xometry’s network. Buyers seeking quotes for parts are responsible for defining the specific requirements for those parts. Please refer to our terms and conditions for more information.


