DLP (digital light processing) is a 3D printing technology that makes use of a projector and a DMD (digital mirror device) to selectively cure a photopolymer one layer at a time. The DMD is an array of tiny mirrors that direct UV light at the build plate in the pattern of each slice of the 3D model.
This article will describe how the digital light process works, the components that make up a typical DLP printer, the pros, and cons of this printing technology, its common applications, and the type of materials that it can employ.
Digital Light Process 3D Printing
DLP (digital light processing) 3D printing is a technique used to create solid plastic objects. This is done by selectively curing a liquid photopolymer with a UV light source one layer at a time until the part is complete. DLP technology has become significantly cheaper over the last decade and is now almost as accessible and affordable as FDM (fused deposition modeling). DLP is different from LCD-type liquid resin printing in that it filters its projector’s light using a digital mirror device. The DMD very precisely directs light to the build platform. LCD-type printers use an LCD screen as the light filter and are typically less precise.
How Digital Light Process 3D Printing Works
The digital light process typically works by lowering a build platform into a transparent resin tank filled with liquid photopolymer. A high-resolution projector then shines a UV light onto the build platform in the same shape as the cross-section of the part layer. The cross-section projection is created with an array of microscopic mirrors called a DMD that direct light only where needed. The density of the array determines the print resolution. This style of DLP printer builds the object upside down.
In rarer cases where the part is built right-side-up, a thin layer of resin is smeared onto the build platform. The DMD can then direct light down from above to form that first layer.
The only photopolymer that gets cured is that which is both illuminated and physically in contact with a solid surface (the build platform or a previous layer). Most upside-down DLP printers run a peeling action across the bottom of the reservoir after each layer to remove any resin that cured at the bottom of the tank. Once a layer is complete, the build platform moves up by the thickness of one layer, and the process is repeated until the part is completed. For right-side-up DLP printers, after one layer is complete, the build platform will move down by one layer, and another layer of resin is smeared over the top of the previous layer.
A finished DLP part is effectively constructed of thousands of small cubic volumes; the cube’s cross-section is equal to the projected mirror size and the cube height is equal to the layer height. Each of these cubic volumes is called a voxel.
| Pros | Cons |
|---|---|
Pros High speed: Because it prints an entire layer at a time, DLP 3D printing is one of the faster 3D printing technologies. Some SLA-type printers can print at comparable speeds but DLP far exceeds the speed of other technologies like FDM. | Cons Expensive raw material: Photopolymer resin is a specialized material and as such is significantly more expensive than other printing materials like plastic filament. |
Pros High detail: DLP printers can make parts with very high levels of detail. The greater the resolution of the digital mirror device, the more detailed the part | Cons Brittle parts: Rigid photopolymer resin does not typically have good mechanical properties. One of the main issues is that DLP parts are very brittle and can crack more easily than other common materials such as ABS or Nylon. More resilient, elastomeric DLP resins are more expensive than rigid ones. |
Pros Rubber-like prints: DLP can print in elastomeric materials that have a shore A hardness of around 90. This means that functional rubber-like parts can be printed with high detail and complex internal lattice structures. | Cons Messy post-processing: DLP parts are not ready for use right off the printer. They must first be cleaned of any excess resin using a solvent and then post-cured under a UV light to achieve full strength. |
DLP Printing Materials
Only photopolymer materials work in DLP printers. A photopolymer is made up of monomers, oligomers, and photoinitiators. When exposed to UV light, the photoinitiator breaks down into reactive free radicals that initiate the polymerization process. The new polymer chains can then cross link between one another, ultimately hardening to form the part. Most photopolymers are designed to exhibit properties similar to those of other common engineering thermoplastics. However, they can rarely replicate all such mechanical properties at once. Users must choose which property is most critical. Listed below are some common categories of DLP materials:
- Polycarbonate-like: Excellent strength and thermal resistance with a translucent or clear appearance.
- ABS-like: Excellent toughness and stiffness, plus minimal shrinkage
- Polypropylene-like: Durable impact-resistant material. Can be used for snap joints and living hinges.
- Photo elastomers: High elongation at break and excellent impact resistance.
- Filled: These resins include ceramic or glass particles suspended in the liquid. They exhibit good creep resistance and high heat deflection temperatures.
The Primary Parts of a DLP 3D Printer
DLP printers have very few moving parts. Arguably the most critical components are their projector and digital micromirror devices. Listed below are all the basic parts that make up a DLP 3D printer.
1. Digital Light Projector Screen
The digital light projector is the light source for the photopolymerization process. This light source can either be a screen or a bulb. The light source must put out UV light as this wavelength is energetic enough to initiate the digital light process that polymerizes the photopolymer.
2. DMD (Digital Micromirror Device)
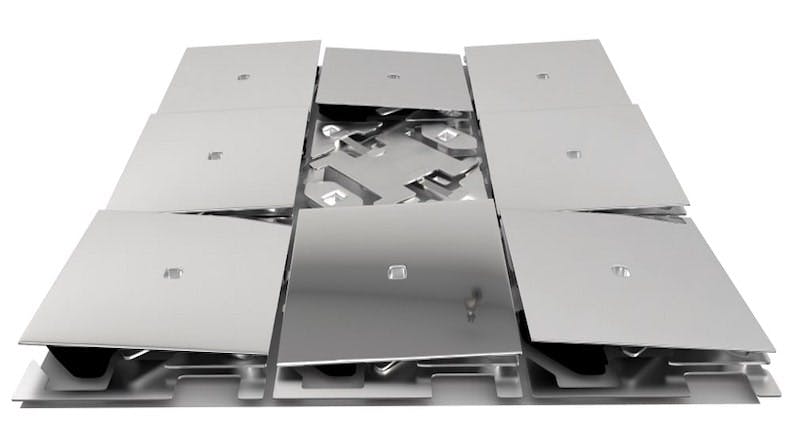
A digital micromirror device is essentially a chip with hundreds of thousands of microscopic mirrors. Any given mirror can be rotated by applying an electric potential difference across it. The light is thus directed into a heat sink or into the lens that focuses it on the build plate. That which goes through the lens will polymerize the resin it strikes. Each mirror can be as small as 10 microns across. An oversized representation of a DMD is shown in figure 1 below:

Figure 1: Digital Micromirror Device
Image Credit: Shutterstock/Peter Sobolev
3. Vat (Resin Tank)
The resin tank houses the liquid photopolymer. The bottom of the resin tank is clear to allow UV light through. DLP resin tanks are typically quite shallow when compared to SLA printer tanks. An alternative to using a resin tank is the process that smears resin onto the build plate one layer at a time, much like SLS 3D printing.
4. Build Plate
A bed plate or build plate is the surface to which the print is attached during the digital light process. With most DLP printers, the print bed is upside down, and it will slowly move one layer upwards at a time as the part is printed.
5. Elevator for the Build Plate
The build plate moves up along the z-axis via a linear actuator. The most common type of linear actuator for this purpose is a ball screw. In place of traditional threads, a ball screw has channels for small metal ball bearings. These metal balls are housed in the ball nut so as to create smooth, low-friction motion. When the shaft is rotated by a stepper motor, the ball nut moves either up or down. Ball screws offer smooth, precise motion.
The Best DLP 3D Printing Resin
The best 3D printing resin depends on the application. However, polypropylene-like resins typically offer the broadest range of uses. These materials can even be used to create parts with snap-fit features and living hinges.
How DLP 3D Printing Is Used in the Medical Industry
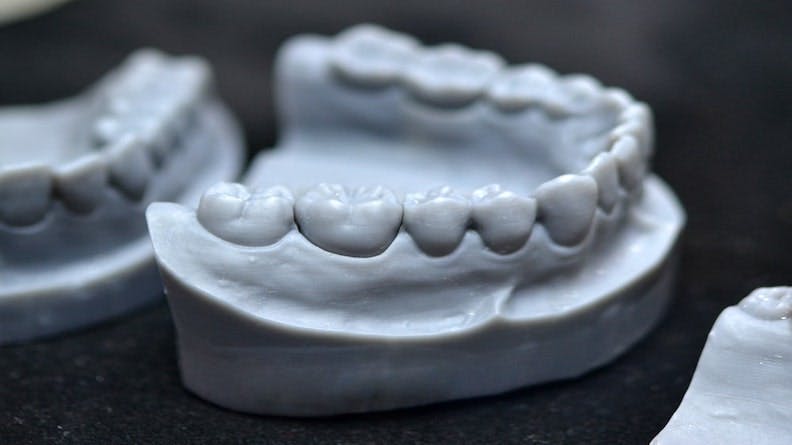
DLP 3D printing is extensively used in the medical industry—particularly in dentistry. Accurate dental models, anatomical models, surgical aids, and custom-fit prosthetics are all great fits for this printing technology. A photopolymer dental model is shown in figure 2 below:

Figure 2: 3D Printed Dental Model
Image Credit: Shutterstock/MarinaGrigorivna
How DLP 3D Printing Is Used in the Jewelry Industry
DLP printers are used to make jewelry patterns for molding purposes. DLP printers can produce parts with exceptional quality and resolution, which makes them ideal for intricate jewelry pieces. Jewelry is designed on CAD software and 3D printed on a DLP printer. The part is then used to create a plaster or silicone mold. Some mold-making resins will fully decompose in a furnace, leaving no residue. The mold is then filled with molten metal, which takes on the shape of the 3D-printed part. This allows jewelers to create complex designs relatively easily and use far less raw metal compared to more manual techniques.
How DLP 3D Printing Is Used in Midsole Manufacturing
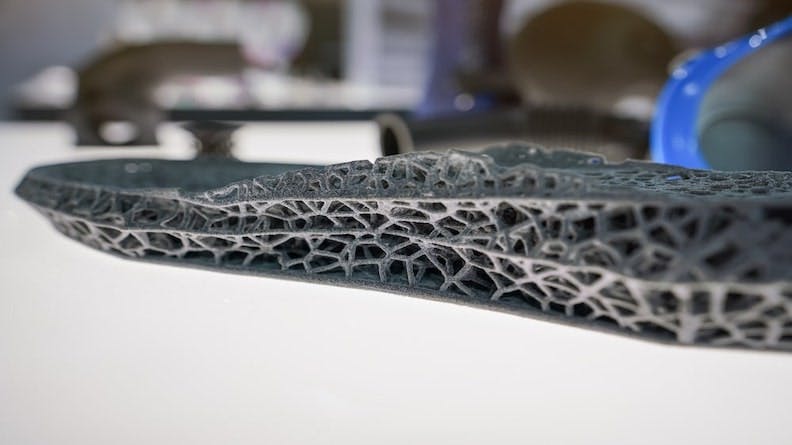
Rubber-like materials can be DLP 3D printed into the shape of shoe midsoles with complex internal lattice structures. These structures remain flexible like traditional midsole materials but limit the overall mass. DLP is well suited to this because it can so accurately print complex hollow structures using elastomeric materials. A typical 3D printed midsole is shown in figure 3:

Figure 3: 3D Printed Midsole
Image Credit: Shutterstock/Lubo Ivanko
How Xometry Can Help
Xometry provides a wide range of manufacturing capabilities, including online 3D printing services and other value-added services for all of your prototyping and production needs. Visit our website to learn more or to request a free, no-obligation quote.
Disclaimer
The content appearing on this webpage is for informational purposes only. Xometry makes no representation or warranty of any kind, be it expressed or implied, as to the accuracy, completeness, or validity of the information. Any performance parameters, geometric tolerances, specific design features, quality and types of materials, or processes should not be inferred to represent what will be delivered by third-party suppliers or manufacturers through Xometry’s network. Buyers seeking quotes for parts are responsible for defining the specific requirements for those parts. Please refer to our terms and conditions for more information.

