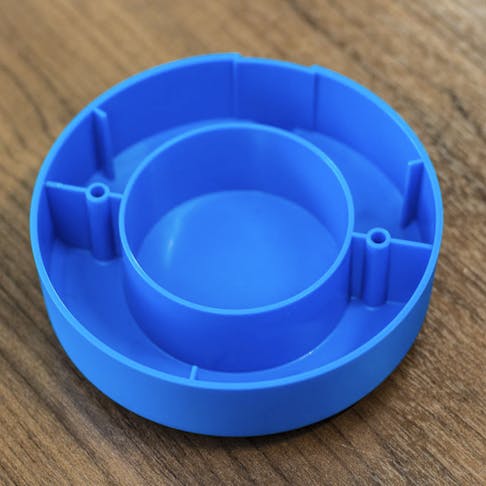
Plastic Ribs for Injection-Molding Design
Plastic injection molding is a very common manufacturing technology and is capable of producing millions of parts at a very low unit cost. However, poorly designed parts or products can end up with unacceptable defects, thus rendering their extremely expensive molds useless. As such, design-for-manufacture (DFM) principles are critical to the design of injection-molded parts. This article will discuss the best practices for designing one type of critical feature: injection-molded ribs.
FREE Injection Molding Design Guide
Purpose of a Rib
Ribs are thin features in plastic injection-molded parts that run perpendicular to walls or planes. They are common features for many reasons such as those listed below:
- Prevent Warpage - Thick part walls will affect the cooling rate of injected plastic. The material that is in contact with the mold’s surfaces will cool quickest while that in the middle takes longer. This uneven cooling causes internal stresses in the material which, in turn, cause the final part to warp. To combat this, part walls are made relatively thin. However, those thin features are structurally weak so they need to be reinforced with ribs.
- Support Other Features - Ribs are also used to support isolated features like bosses used as fastening points. These bosses need structural support, so they are connected to the side walls with ribs. If they are too far from side walls, isolated ribs are used to reinforce them.
- Reduce Material Use - Strategically placed injection-molded ribs can improve the part’s stiffness in critical areas. The stiffness can thus meet your requirements while everything else remains thin and lightweight.
- Improve Mold Flow - Injection-molded ribs can be strategically placed to pull double duty. If they’re properly designed for manufacturing, they improve the molten plastic’s flow into the mold in addition to strengthening the end product.

Plastic Rib Design Best Practices
As with any injection-molded feature, there are a few DFM rules that need to be adhered to. Failure to do this will result in defect-ridden parts. The molds themselves are very expensive to fix after they’ve been created, so it is critical to design the part correctly the first time. Listed below are some common guidelines for designing ribs into injection-molded parts.
1. Rib Geometry
The rib geometry is critical to preventing defects. Listed below are some of the common rules associated with the shape, spacing, and size of ribs.
- Rib Thickness - The thickness of a rib must be no more than 60% of the nominal wall thickness of the part. Glossy materials may require ribs with a thickness of 40% of the nominal wall thickness. Ribs that are too thin may not properly fill since the plastic’s viscosity may be too high to adequately flow into the narrow cavity. Too thick, and the rib may itself warp or form unsightly sinks. Create multiple thinner ribs rather than one thick rib.
- Changes in Thickness - If a rib needs to vary in thickness, make the change as gradual as possible. It will help eliminate stress concentrations and cooling variations which may cause warpage. As a rule of thumb, the distance it takes to narrow the rib’s thickness should be equal to 3 times the change in thickness.
- Rib Coring - If thick ribs are unavoidable, they should be cored to eliminate potential defects.
- Angle of intersection - A rib does not always need to intersect side walls at 90 degrees. Angled intersections can increase the overall stiffness of the part without having to increase the rib thickness. However, care must be taken to ensure that the point of intersection is not too thick as this may cause sinks to form on the opposite surface.
- Rib Radii - It is important to include a radius where the rib intersects with either the base or sidewall. This radius should typically be 0.5 to 1 times the thickness of the part wall. This helps eliminate stress concentrations and increases the strength of the rib. In addition to this, molds with larger radii are much cheaper to machine.
- Rib Height - Rib height must be limited to 3 times the rib thickness to eliminate potential underfilling. Large ribs can be replaced with multiple smaller ribs.
- Rib Draft - The draft angle of a rib should be between 0.5 and 1.5 degrees to allow for easy part ejection. Only crush ribs should be made without a draft angle.
- Rib Spacing - When you create multiple ribs, they should be spaced out by at least 2.5 to 3 times the nominal wall thickness. In addition to this, a staggered pattern can help reduce potential warpage during cooling.
2. Mold Design
Apart from the shape, it is important to design ribs for optimal mold performance. Listed below are some factors to consider when designing ribs for injection-molded parts.
- Mold Flow - Position ribs such that the plastic has an optimal flow path. This can be achieved by connecting ribs to each other.
Summary
Though there are a lot of considerations to take into account when designing plastic ribs, it’s important to remember they’re not the only piece of the puzzle. Plastic rib design should not be performed in isolation; rib designs will affect many other critical aspects of the part. To learn more about the best practices for this type of design, refer to the Xometry plastic ribs injection-molding design guide or contact a Xometry expert.
Disclaimer
The content appearing on this webpage is for informational purposes only. Xometry makes no representation or warranty of any kind, be it expressed or implied, as to the accuracy, completeness, or validity of the information. Any performance parameters, geometric tolerances, specific design features, quality and types of materials, or processes should not be inferred to represent what will be delivered by third-party suppliers or manufacturers through Xometry’s network. Buyers seeking quotes for parts are responsible for defining the specific requirements for those parts. Please refer to our terms and conditions for more information.


