Different styles of machined holes have different uses across the machining and engineering industry. Each type serves its own purpose and should be selected carefully to create the most accurate and functional machined parts.
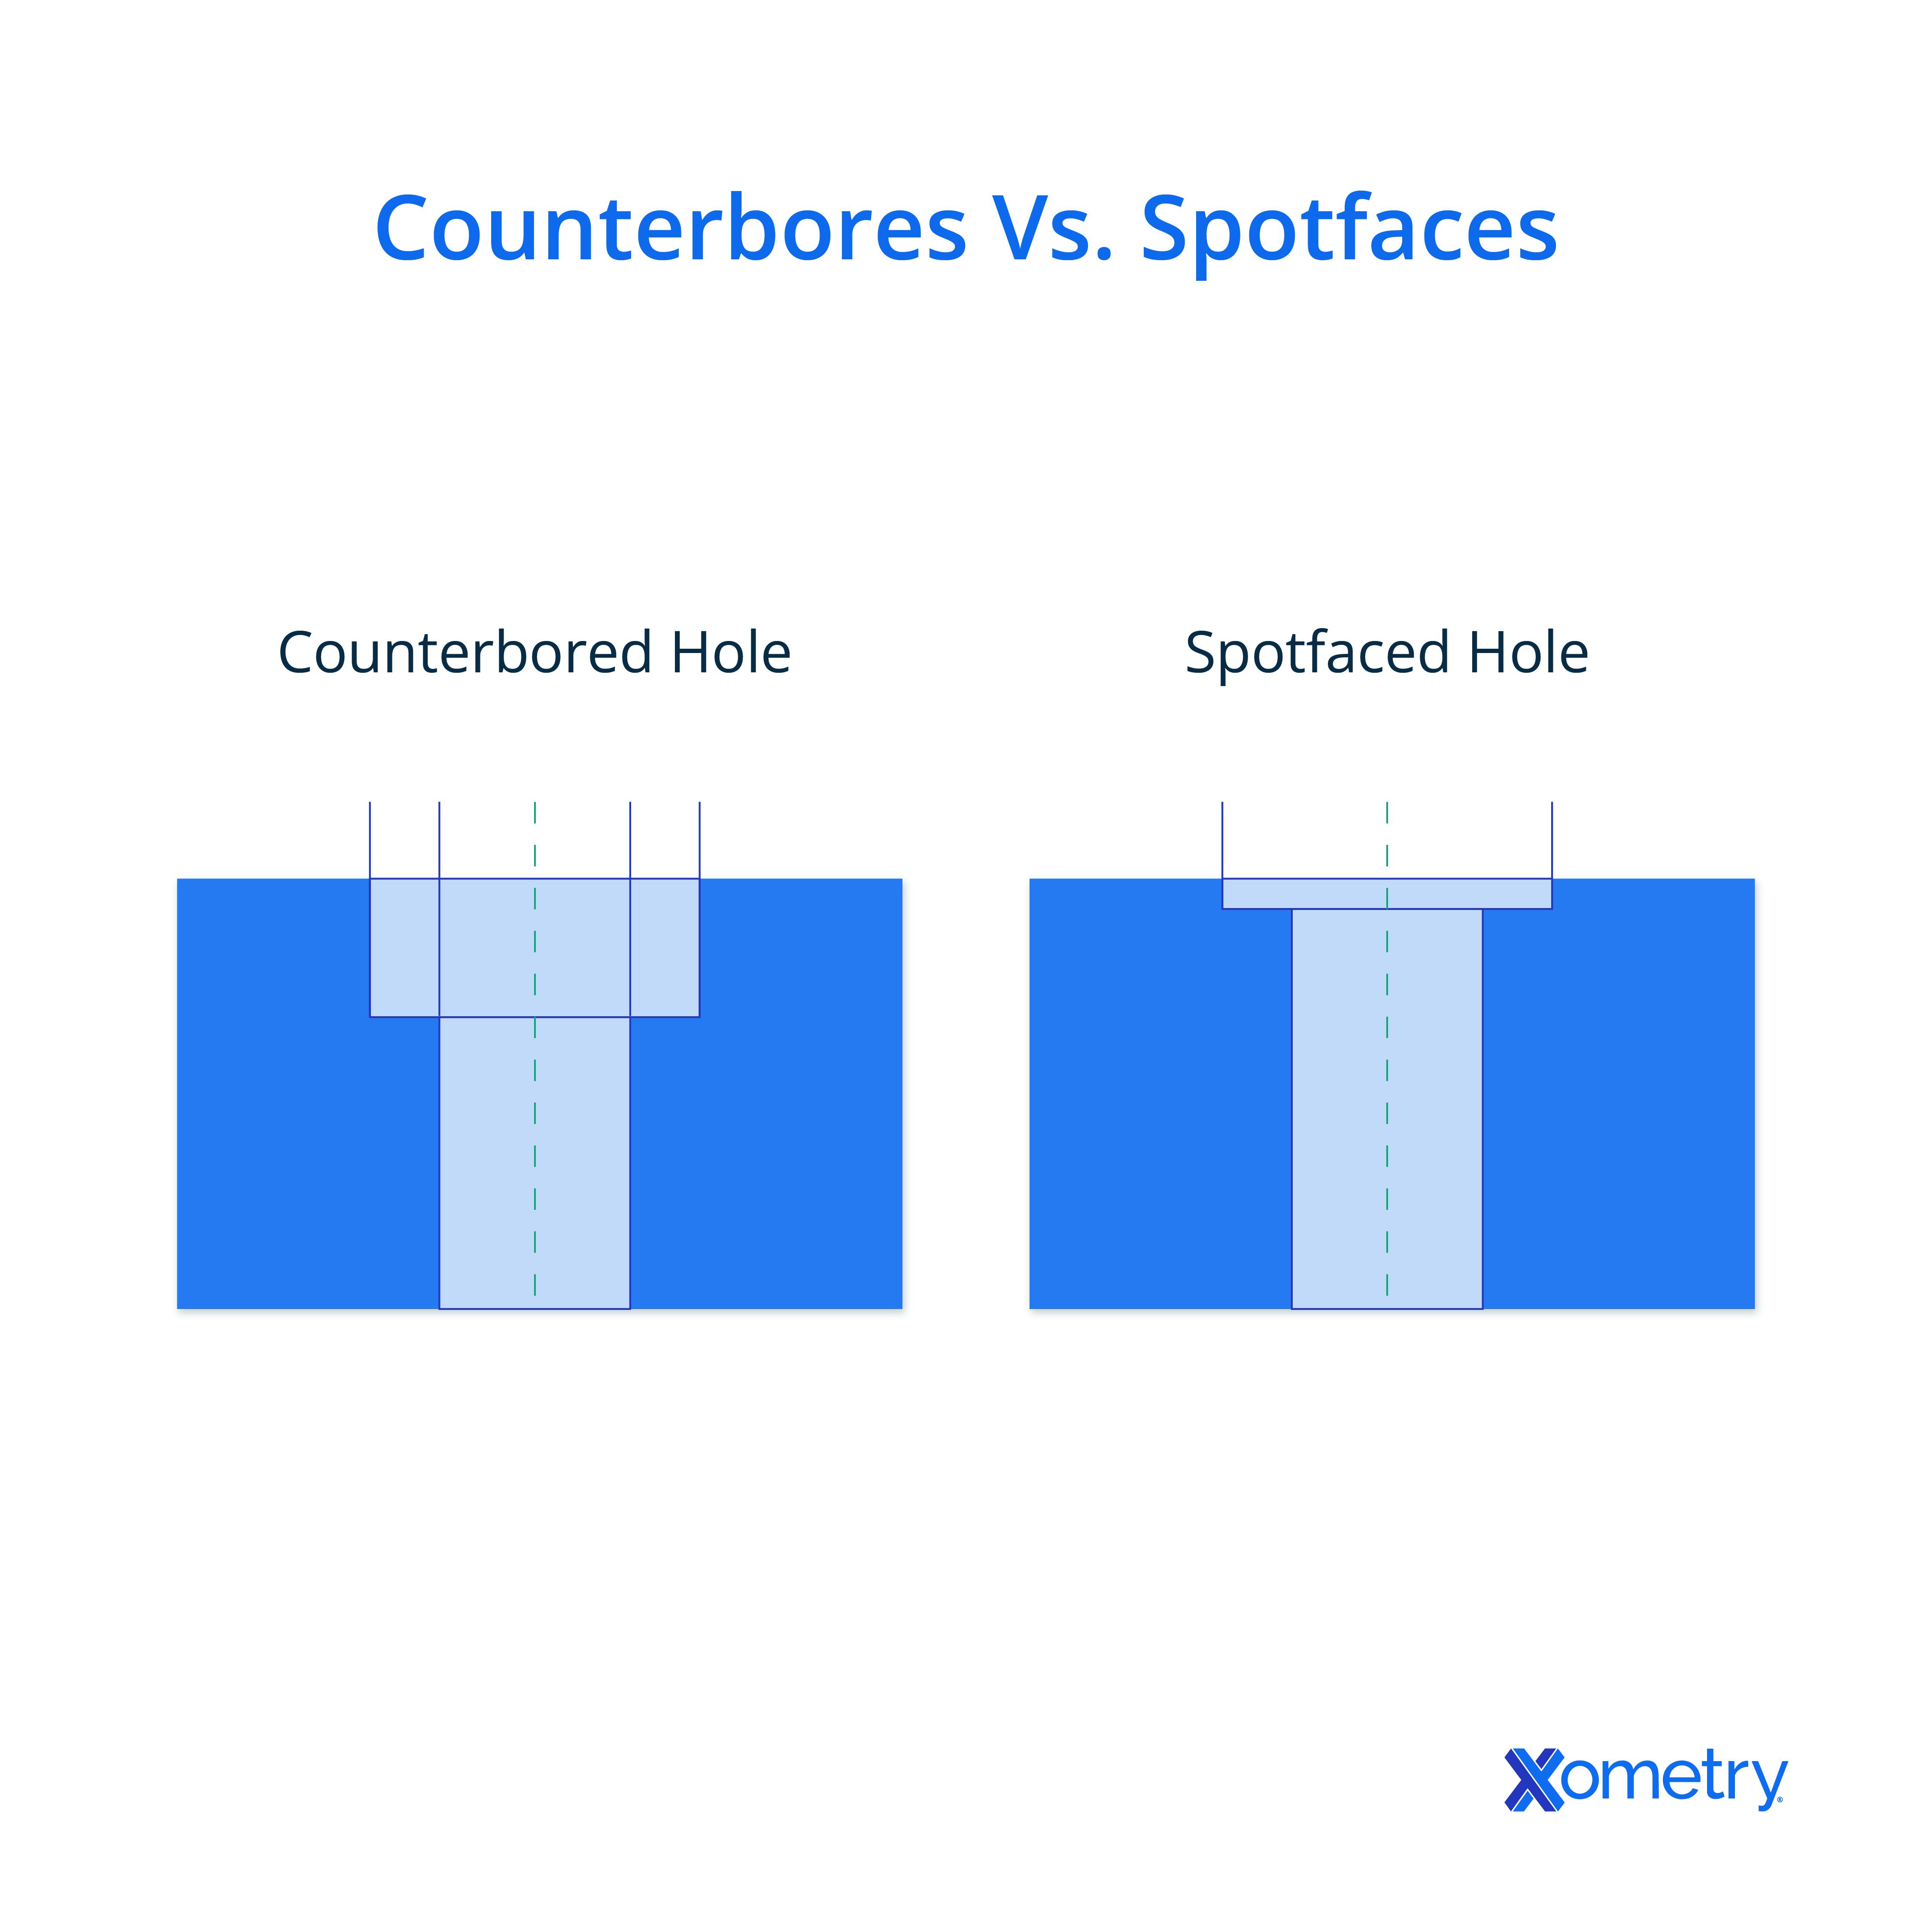
Spotfaced and counterbore holes are very similar in appearance, but a few key differences lend them to distinct applications. A counterbore creates a mounting surface that is both flat and recessed while a spotface simply offers a level mounting surface.
This article highlights the differences between spotface holes and counterbore holes. These holes are compared in terms of shape, depth, callout symbol, and applications. Both styles are also defined to clarify their distinct features and ideal use cases.
Introduction to Spotface Holes and Counterbore Holes
A spotface is a very shallow counterbore hole, meaning it is a basic cylindrical screw hole with a wider but shallow pit. Instead of allowing the fastener to sit fully below the level of the workpiece’s surface, a spotface hole is sunk just enough to create a level surface for the screw or nail head to rest against. They’re most critical when the workpiece has an uneven surface or when the fastener goes in at an angle other than 90°.
A counterbore hole is meant to protect the head of its fastener. In essence, a counterbore screw hole is a basic cylindrical screw hole with a flat bottom that has a larger hole above it. This screw hole is ideal in cases that require a fastener, such as a screw, to sit flush with or below the level of a workpiece's surface.

Spotface vs. Counterbore: Depth
Both spotface and counterbore styles consist of two coaxial cylindrical holes; the narrower and usually deeper one is meant for the screw’s shaft while the upper space of larger diameter is where the screw or bolt head fits. The main difference between a counterbore hole and a spotface hole is the depth of the upper cavity. A counterbore hole is typically deep enough to place a fastener's head below a part's surface. This can vary depending on the type of fastener you use and how broad the head is.
In contrast to a counterbore hole, the spotface style has a shallower profile and is designed to create a level area on an uneven surface. As a rule of thumb, a spotface’s depth defaults to the minimum necessary to place the fastener’s full diameter onto an even surface. If the part’s surface is already flat and meets the screw at a 90-degree angle, there’s no need to add extra depth. In this case, only a simple hole is required.
Spotface vs. Counterbore: Shape
Both spotface and counterbore holes are created through mechanical milling or drilling processes. Counterbore and spotface holes have similar shapes so they can be created in a similar manner. First, a pilot hole is drilled into the part. This is just a basic cylindrical hole in the component. Most counterbore holes go right through the part, in which case drawings won’t specify a depth. If the hole does not go all the way through, the depth of the pilot hole will be indicated in the drawing.
After the pilot hole has been drilled, the counterbore hole can be created. This is a larger hole that goes on top of the pilot hole. These holes are coaxial. Usually, it should be large enough to conceal the head of the fastener. Spotface holes, on the other hand, are also cylindrical and may have the same diameter as counterbore holes, but differ in depth. The hole is not intended to ‘hide’ the head of the fastener, but rather to create a level surface on which it can seat. This is especially important for uneven surfaces.
The instrument used to drill the holes will determine the form of the hole's bottom. The angle at the bottom will be the same as that of the drill tip. If the part needs a flat-bottomed hole, use a ‘boring’ technique or a tool with a zero tip angle.
Callout Symbols
The ‘⌴’ symbol is used to indicate a counterbore hole on engineering drawings. The depth number and the diameter symbol are also included for counterbore holes. Spotface indications do not have their own symbol but instead, use the counterbore symbol with the letters ‘SF’ inside it.
Applications
Though spotface and counterbore holes are similar in appearance, they differ in application. Both holes are common in machining and woodworking applications.
A counterbore is typically deep enough to place a fastener's head below a part's surface. It is used in applications where an exposed bolt head could catch on other items or where the part’s surface must butt up against another part.
In engineering, spotfaces are used to produce a flat, smooth surface on a machined item. More specifically, a spotface makes a portion of an uneven surface flat. Casting-produced components, for instance, might not have perfectly flat and smooth surfaces. Spotface holes are drilled to ensure that fasteners sit properly and securely on rough or curved surfaces.
Other Types of Holes in Machining
There are a lot of different types of holes used in machining. Some others include:
- Simple Hole: Simple holes are created by simply cutting a circle out of a workpiece.
- Through Hole: A through hole is a hole that goes all the way through a workpiece.
- Blind Hole: A hole that doesn't go all the way through the material is called a blind hole. If cut to the specified depth, the blind hole will not reach the opposite side of the workpiece.
- Countersink Hole: A countersink hole is a simple hole with an added conical cutout at its mouth, often to accommodate the cone shape of certain fasteners.
- Tapered Hole: A tapered hole is a hole that is wider at one end than the other.
Note that the fasteners you use must meet essentially the same standards of quality as the drilled hole. The fastener must be dimensionally accurate and durable so that your precision machining work does not go to waste.
Summary
This article presented spotface and counterbore holes, explained what they are, and discussed what each hole is used for. To learn more about holes in machining, contact a Xometry representative.
Xometry provides a wide range of manufacturing capabilities, including CNC machining and other value-added services for all of your prototyping and production needs. Visit our website to learn more or to request a free, no-obligation quote.
Disclaimer
The content appearing on this webpage is for informational purposes only. Xometry makes no representation or warranty of any kind, be it expressed or implied, as to the accuracy, completeness, or validity of the information. Any performance parameters, geometric tolerances, specific design features, quality and types of materials, or processes should not be inferred to represent what will be delivered by third-party suppliers or manufacturers through Xometry’s network. Buyers seeking quotes for parts are responsible for defining the specific requirements for those parts. Please refer to our terms and conditions for more information.


