MIG (metal inert gas) welding is a manufacturing and fabrication process known for its speed, low cost, and teeny tiny learning curve (there basically isn’t one). Like other welding methods, MIG is used to join metal parts together — our customers choose it a lot for their steel, aluminum, and cast iron parts. For more on how the process works, a little on its history, and a how-to guide for the best welds with this process, keep on reading.
What is MIG Welding?
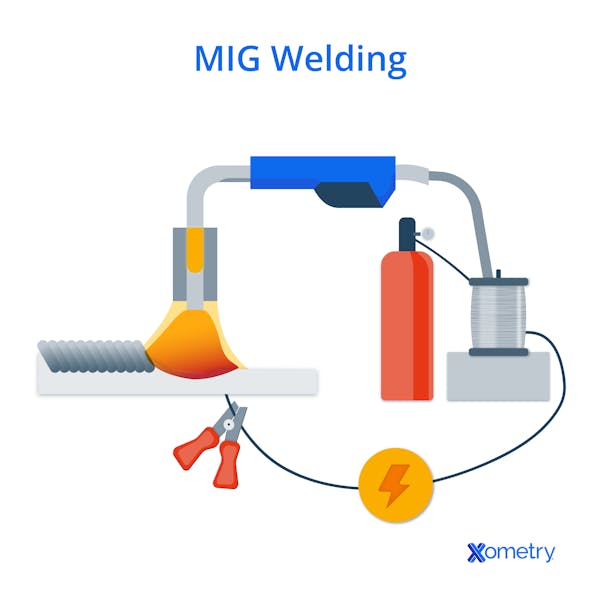
MIG welding is a gas metal arc welding (GMAW) type that uses electricity via an arc that creates a massive amount of heat (up to 5,432°F!), which melts metal parts and permanently fuses them together. You might sometimes see it called flux-core arc or short-circuit welding, but these just mean the same thing. The main piece of equipment in MIG welding is the welding gun which holds the filler metal. When you pull the trigger, the electric arc is activated and starts to melt the filler metal and the workpiece. At the same time, the gun will release what’s referred to as “shielding gas”—an inert gas, like argon or a mix with CO2—that will prevent the hot metal from reacting with the air (this could make it weak or rust).
Though there have been MIG welding equipment upgrades over the years, the process hasn’t changed since its invention in 1948 in the USA—and neither has its mass use. This new (at the time) method was different from other welding methods that manufacturers and fabricators were using as its arc-creating electrode was a filler rod, instead of the ones they were used to, which needed frequent replacement due to deterioration. MIG welding has been used for decades to make car parts, pipes, steel structures, and many other things. It’s quick to do and a breeze to get the hang of, even without copious training or particular skills.
MIG welded joints might not be as strong or precise as those done with other methods, but you can MIG weld on thick and thin materials, and the finished welds don’t need much (if any) cleaning or finishing (unless you need to make it more aesthetically pleasing). It’s also cost-effective — the machinery isn’t all that expensive, and since welding is a fairly short process, your electricity bill won’t be sky high either. You will need to buy replacement shielding gas cylinders, though, and the machine isn’t as portable as a gas welder.

Compatible Materials
Many metals can be MIG welded, but it’s especially efficient for copper, aluminum, nickel alloys, and steel. To weld copper, MIG welding is typically the first method you’d go for because the material needs a very high heat in order to melt—something that MIG welding is very capable of. Aluminum welding can be done, but it’s a little difficult as the melt pool can quickly burn through the part and drip out of the other side. When welding aluminum or nickel alloys, you’ll need to use a 100% pure argon gas; although, if you need more energy, you can use up to 40% helium for nickel alloys. With steel, it’s best to use a mix of 75% argon and 25% carbon dioxide for the shielding gas, as pure argon gas will make the weld less ductile.
How to MIG Weld
As mentioned, MIG welding is an easy process but, for strong and reliable joints, there are a few steps to follow:

Getting ready: Make sure the area around you and the workpiece is clean and that you’ve donned all your PPE. Then connect the ground wire to your workpiece or welding table.
Parameters: These need to be set up on the machine according to the material you want to weld and will include the current, speed, arc length, angle, manipulation, and gas flow and wire feed rates. None of these have a standard setting and will all vary based on what metal you’re welding and the thickness of the weld. However, you can refer to standard charts that’ll give you a good idea of the normal parameter settings for different welds, which are generally as follows:
- Current: Higher currents are usually used for thicker metals.
- Arc length: A shorter arc will make a hotter weld.
- Angle: You’ll want to hold the gun in one hand and rest it on the index finger of the other open hand for stability. When welding two metals butted together, the gun should not angle toward one or the other.
- Manipulation: This describes whether the welder pushes (the electrode trails the gun) or pulls (the electrodes lead the movement) the weld pool and should be angled at 10 degrees.
- Speed: This must be steady so that you don’t end up with either an oversized weld bead and holes because you went too slow, or a poorly welded joint due to going too fast.
Clamp and tack: Clamp the pieces to be welded together in place, then create tack welds at either end of the joint (a tack weld is a quick spot weld meant to hold the two workpieces together for the full welding process that will follow).
Weld away: Weld along the joint either by pushing or pulling the weld, with the gun at half of the angle between the parts to be joined. For instance, angle it 90 degrees to a butt joint and 45 degrees to a T-joint.
Cooling: You don’t need to do anything for this part! Just leave it alone and give the material enough time to cool and harden before touching or lifting it. This happens quite quickly anyway.
And that’s all there is to it. Although some welding technique will come in handy for a good weld, the most important things are a steady hand and a good gun position with the tip no more than 3⁄4-inch from the metal so that the gas can cover the whole weld pool.
MIG Welding vs. Other Methods
The main thing that makes MIG welding different from other types is that its consumable electrode doubles as the weld filler. TIG welding’s electrode is just for the arc generation and a separate hand-held filler rod is needed. Laser welding is a whole other process entirely and uses a laser to both heat and melt the metal. We’re obviously not ruling out laser and TIG welding; they’re excellent for making strong, accurate, and pretty welds (better than MIG’s offerings, anyway). But when it comes to speediness, low cost, and ability to weld thick materials, these processes can’t compare to MIG welding.
Disclaimer
The content appearing on this webpage is for informational purposes only. Xometry makes no representation or warranty of any kind, be it expressed or implied, as to the accuracy, completeness, or validity of the information. Any performance parameters, geometric tolerances, specific design features, quality and types of materials, or processes should not be inferred to represent what will be delivered by third-party suppliers or manufacturers through Xometry’s network. Buyers seeking quotes for parts are responsible for defining the specific requirements for those parts. Please refer to our terms and conditions for more information.


