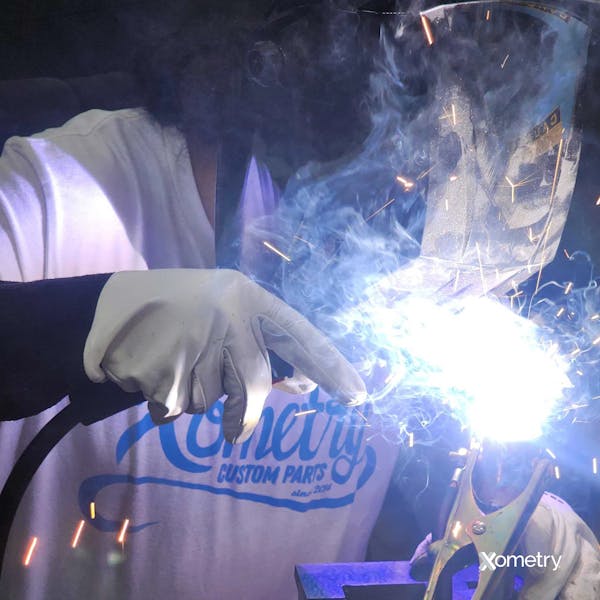
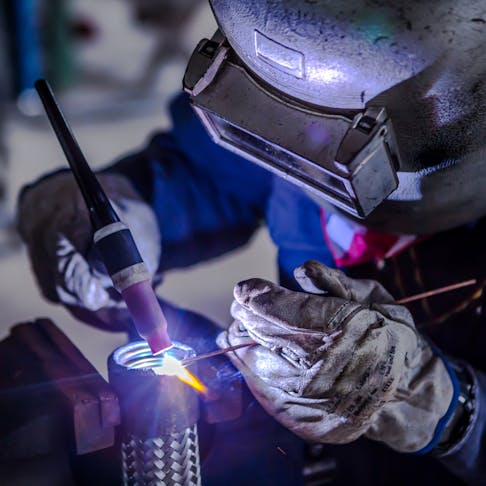
TIG (tungsten inert gas) welding is a common method used in manufacturing to join pieces of metal together. It’s a form of GTAW (gas tungsten arc welding) and is used for many things, including assembling exhausts, fuel lines, tanks, and structural and engine parts in aerospace and car manufacturing. It’s a go-to for many because it can make strong and reliable high-quality welds that are aesthetically pleasing. The process produces very minimal splatter, so there’s a lot less post-weld cleanup needed.
We’ll explain exactly how this welding method works, how it’s different from other popular welding types, like MIG (metal inert gas) and laser welding, and also, how you can do it!
What is TIG Welding?
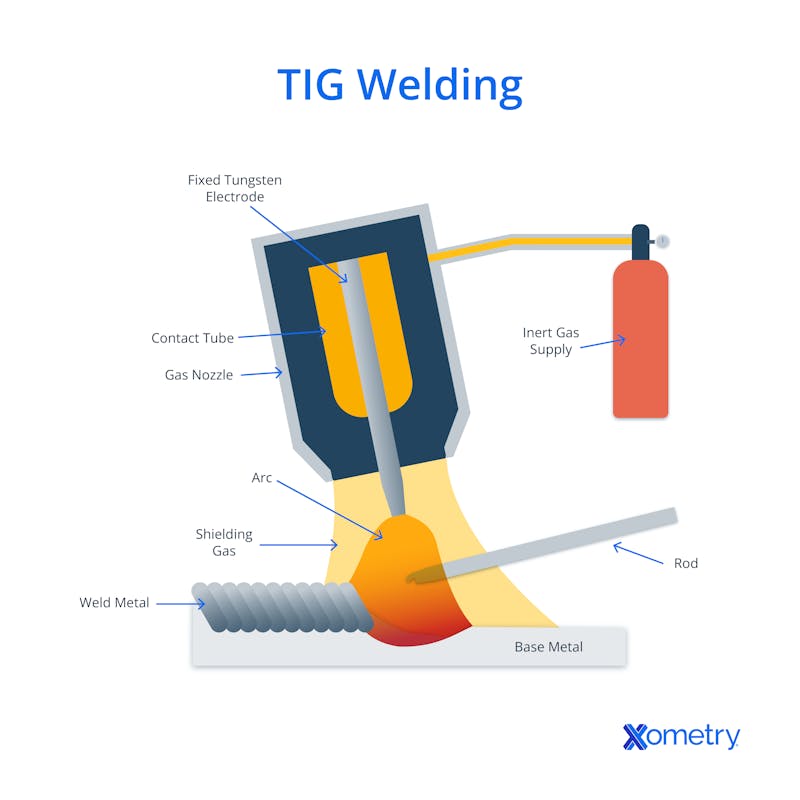
TIG welding makes joints in metals via a tungsten electrode in the torch. This electrode produces a very high-temperature arc (up to 11,000°F) that melts the metal and creates a weld pool. A filler metal can also be used if you want to make an extra strong joint. The reason the method has the “IG” in its name is because it uses a non-reactive shielding gas (usually argon) to protect both this electrode and the area you’re welding from any contamination in the air. If it weren’t for this gas, the metal could form rust or oxidize.
The gas is stored in a cylinder, and the flow of the gas as well as the arc formation is controlled by the TIG torch. In addition to the torch, the electrode, and the shielding gas, a TIG welding system also has a power source for the electricity it needs to operate and a foot pedal or some type of hand control to control the current. You can see all the different parts of a TIG welding system in the diagram below.

One of the main reasons this welding method is at the top of many manufacturers’ fabricating methods list is that it’s compatible with many different nonferrous metals, including copper, aluminum, and steel (like carbon and low-alloy). If you’re TIG welding stainless steel, you’ll want to use a DC machine to give the electrode negative polarity so that the metal can stay corrosion-resistant. The best way to do this is by connecting the torch to the welder’s negative terminal and the ground clamp to the positive terminal.
TIG is the most common welding method used on nickel alloys because the material needs the gas protection for best results. With this material, argon or helium (or even a mix of the two) is used, but an argon-hydrogen gas mix will be best for pure nickel. Another alloy that is typically TIG welded is chromium-molybdenum (chromoly), which is used to make bicycles and motorbikes because other welding methods might cause cracks in the metal. It can even work on thin metals, thanks to the precise heat control offered, but it won’t be the best option if you have thick materials to weld because of its slow deposition rate.
What Is the Other Term for TIG Welding?
TIG welding is also known as gas tungsten arc welding (GTAW). The two names contain the same basic information: a tungsten electrode produces an electric arc to heat the workpiece while being shielded with an inert gas such as argon.
How Does TIG Welding Differ from MIG Welding?
The main difference between TIG and MIG welding is that the latter has a consumable electrode that doubles as the weld filler. A TIG electrode just generates the arc and if you needed a filler metal, you’d have to add a rod or some type of hand-held filler. With laser welding, a high-powered laser beam is used to make the melt.
In comparison to MIG welding, TIG tends to take a little longer and more skill is needed. The get-up is also a bit more expensive than MIG or oxyfuel welding equipment. Like MIG, laser welding is also faster than TIG and it can make more compact welds because it has a smaller heat-affected zone. Laser can also work with other materials like plastics, not just metals.
How Does TIG Welding Work?
To make the best welds with this process, here’s an easy step-by-step guide to TIG welding:
- Get all your necessary gear together (the welding machine, electrode, filler rod (if necessary), gas cylinder, and all your PPE, like gloves and welding helmet)
- Clean the workpiece thoroughly with a wire brush or solvent
- Set up the welding machine and adjust its settings according to your metal’s type and thickness
- Grip the torch at an angle of around 70–80°, then lift it just a touch, keeping the tip 1/16 to 1/8 inches from the workpiece (don’t let the tungsten come into contact with it; this could cause contamination and you’ll have to regrind the tungsten)
- A steady hand is needed so that you can move the torch and direct the arc along the weld path in a controlled way
- Adjust the amperage (and filler rod if you have it) to control the heat
- Keep the torch as close to the workpiece as you can for better control and visibility
- Once you’ve finished, slowly reduce the amperage and let the weld cool down
- When it’s cooled, check for any defects, and if you need to make any adjustments or repairs, this is when you’d do them.

What Is the Primary Use of TIG Welding?
The primary use of TIG (tungsten inert gas) welding is to join metals with a high degree of precision and control. TIG welding is common in automotive, aerospace, and fabrication plants. It is especially suitable for thin materials and provides excellent weld quality with minimal distortion.
What Are Examples of TIG Welding Applications?
Examples of TIG (tungsten inert gas) welding applications include:
- Automotive Industry: TIG welding is used to assemble exhaust systems, fuel tanks, and engine components.
- Aerospace Industry: It is employed on aircraft components like engine parts, aluminum and titanium structural members, and fuel lines.
- Fabrication Industry: For various fabrication projects, TIG welding is used to join non-ferrous metals like aluminum, copper, and others.
How To Use TIG Welding?
To apply TIG welding effectively, follow these steps:
- Gather the necessary equipment: TIG welding machine, tungsten electrode, filler rod, gas cylinder, protective clothing, and welding helmet.
- Prepare the workpiece by cleaning it thoroughly with a wire brush or solvent to ensure a clean surface.
- Set up the TIG welding machine and adjust the settings to match the material and thickness.
- Grip the TIG torch with your hand, positioning it at an angle of around 70 or 80 degrees. Lift the torch slightly, keeping the tungsten tip 1/16 to 1/8 inch from the workpiece. Be careful not to let the tungsten come into contact with the workpiece as this can lead to contamination of the material, requiring you to regrind the tungsten.
- Maintain a steady hand and move the torch in a controlled manner, directing the arc along your desired weld path.
- Control the heat input by adjusting the amperage and filler rod as needed.
- Keep the torch close to the workpiece for better control and visibility.
- Once the weld is complete, gradually reduce the amperage and allow the weld to cool.
- Inspect the weld for defects and make adjustments or repairs as necessary.
When To Use TIG Welding?
TIG welding is a common option when exact, high-quality welds are required. It is usually the best option for delicate seams, thin materials, and non-ferrous metals like copper, aluminum, and brass. TIG welding creates neat, aesthetically pleasing welds in a controlled manner with very little spatter.
What Are the Different Parts of TIG Welding?
The TIG welding system is composed of:
- Power Source: Provides electrical energy for the welding process.
- TIG Torch: Holds the tungsten electrode and controls the shielding gas flow.
- Tungsten Electrode: Forms the arc and withstands high temperatures.
- Shielding Gas: Protects the weld area from atmospheric contamination.
- Filler Metal: Optional material added to reinforce the weld.
- Gas Cylinder: Stores the shielding gas, such as argon or helium.
- Foot Pedal or Hand Control: Regulates the welding current.
What Are Some Types of Materials TIG Welding Weld?
TIG welding functions on a variety of materials, including:
1. Aluminum
Oftentimes, TIG welding is the optimal choice for aluminum parts. TIG equipment allows for precise control and produces high-quality welds, making it suitable for applications in aerospace, automotive, and other industries.
2. Stainless Steel
When TIG welding stainless steel, employ a DC machine to give the electrode negative polarity. The TIG torch must be connected to the negative terminal of the welder and the ground clamp to the positive terminal. Doing so gives you better control over heat input, minimizes distortion, and ensures the integrity of the stainless steel's corrosion-resistant properties.
3. Steel
TIG welding is suitable for many types of steel, including carbon steel and low-alloy steel. It allows for precise control over heat input and produces high-quality welds with minimal spatter. TIG welding is commonly used in structural fabrication, piping, and automotive production.
4. Chromoly
Chromoly (chromium-molybdenum alloy) is a popular material in motorsports and bicycle manufacturing. TIG welding produces strong, crack-free welds that other processes can’t match on chromoly materials. TIG welding's precise control over heat input helps prevent heat-affected zone (HAZ) issues and ensures the material's mechanical properties are maintained.
5. Nickel Alloys
Nickel alloys, which are renowned for their corrosion resistance and high-temperature strength, are usually welded using TIG machines. Nickel alloys typically need shielding gasses like argon, helium, or a mix of the two for the best results. An alternative is to use an argon-hydrogen gas mixture designed specifically for welding pure nickel. It is appropriate for use in the power generation, chemical processing, and aerospace industries.
What Is the Hardest Metal to TIG Weld?
Aluminum can be challenging to TIG weld due to several factors. Aluminum is very thermally conductive; the heat dissipates quickly, leading to a narrow welding window. Additionally, aluminum forms an oxide layer that must be removed before welding, requiring specialized techniques and equipment.
What Is the Easiest Metal to TIG Weld?
The definitive answer is mild steel. Mild steel is widely used in construction and manufacturing because its low carbon content makes it ductile and machinable. It can be easily welded using both TIG and MIG methods, making it a versatile metal for welding applications.
What Metals Should Not Be TIG Welded?
While TIG welding is a versatile process, certain metals pose challenges and should be avoided. Reactive metals like brass and titanium have high melting points and require specialized equipment and techniques. Cast iron is also difficult to TIG weld due to its high carbon content and tendency to crack.
How Strong is TIG Welding?
TIG butt welds are typically very strong, with ultimate tensile strength reaching up to 97% of the base metal's ultimate tensile strength. This indicates that TIG welding can effectively join components while maintaining a significant portion of their original strength.
Is a TIG Weld Stronger Than a MIG Weld?
Yes, TIG welds are generally stronger than MIG welds. TIG welding provides better penetration and control, resulting in stronger fusion between metals. TIG weld beads have fewer imperfections, which means fewer opportunities for excessive stress concentration that can lead to bigger problems.
What Are the Advantages of TIG Welding?
Advantages of TIG welding include:
- Precise, clean, and aesthetically appealing welds.
- It can be used to weld a wide range of metals, including stainless steel, aluminum, copper, and nickel alloys.
- Thin materials can be TIG welded thanks to precise heat control.
- Less post-weld cleanup is required because TIG welding produces little spatter.
- Strong and reliable welds with good fusion are produced by TIG welding.
What Are the Disadvantages of TIG Welding?
Disadvantages of TIG welding include:
- Compared to other welding techniques like MIG, TIG welding generally takes longer.
- TIG welding requires a higher level of skill and expertise to operate the equipment effectively.
- It may be challenging to weld thick materials because of the TIG process’ slow deposition rate.
- In comparison to MIG welding and oxyfuel welding, TIG welding supplies and equipment can be more expensive.
What Is the Difference Between TIG Welding and Laser Welding?
The main differences between TIG welding and laser welding are:
- Heat Source: TIG welding heats the workpiece using an electric arc between a tungsten electrode and the workpiece, while laser welding employs a high-powered laser beam.
- Speed: Laser welding is typically faster than TIG welding.
- Precision: With a smaller heat-affected zone and greater precision, laser welding produces more compact welds.
- Material compatibility: While TIG welding only works with metals, laser welding is appropriate for a variety of materials, including metals and certain plastics.
Frequently Asked Questions About Tig Welding
Can You Use a TIG Welder Without Gas?
No, you cannot use a TIG welder without gas. A shielding gas (typically argon) is essential in TIG welding to shield the tungsten electrode and the weld pool from oxygen and other atmospheric contamination. Additionally, the gas serves to cool the TIG torch, ensuring its longevity and preventing damage from overheating.
Is It Difficult To Use TIG Welding?
Yes, TIG welding is considered difficult to master. It requires a high level of coordination, practice, and skill compared to other forms of welding. The process involves simultaneously controlling the foot pedal, supplying filler material, and precisely aiming the electrode, making it challenging for beginners.
Is TIG Welding the Same as Arc Welding?
No, the terms are not entirely interchangeable. TIG welding, or tungsten inert gas welding, is a specific form of arc welding that uses a non-consumable tungsten electrode and an inert gas shield. Arc welding, on the other hand, is an overarching term that encompasses all welding processes that use an electric arc to create a weld.
How Xometry Can Help
When it comes to welding, our weldment services are a hit with our customers. Whether you need TIG, MIG, shielding, spot, or laser welding, let us help you out. If you upload your design on our site, you can get a free instant quote with absolutely no obligation. You can also reach out to one of our reps anytime you like.
Disclaimer
The content appearing on this webpage is for informational purposes only. Xometry makes no representation or warranty of any kind, be it expressed or implied, as to the accuracy, completeness, or validity of the information. Any performance parameters, geometric tolerances, specific design features, quality and types of materials, or processes should not be inferred to represent what will be delivered by third-party suppliers or manufacturers through Xometry’s network. Buyers seeking quotes for parts are responsible for defining the specific requirements for those parts. Please refer to our terms and conditions for more information.


