Technical Datasheet Glossary
Technical datasheets (TDS) summarize the tested properties of a material; providing critical information to engineers and designers on how their product may function if that material is utilized. This glossary outlines common properties you may see on a datasheet with definitions, units, and common test methods.
Physical Properties
- Moisture Absorption, (%): Moisture absorption, also called water absorption, is defined as the capacity of a polymer to absorb moisture from its environment. Absorbed moisture acts as a plasticizer, reducing the glass transition temperature and strength of plastics. Testing Methods: 24 hours Prusa Polymers, 7 days Prusa Polymers, and 4 weeks Prusa Polymers
Thermal Properties
- Coefficient of Thermal Expansion (CTE), (mm/mm/°C, in/in/°F): The coefficient of linear thermal expansion (CTE) indicates the extent of a material's expansion upon heating. Testing Methods: ASTM D696
- Mean Coefficient of Thermal Expansion (CTE), (µm/[m·°C], µin/[in·°F]): The Coefficient of Linear Thermal Expansion (CTE) indicates the extent to which a material expands when heated. The mean CTE is defined as the slope of a secant through two points of the curve of thermal expansion. Testing Methods: ASTM E831
- Glass Transition Temperature (Tg), (°C, °F): Glass transition temperature (Tg) is the temperature at which polymers undergo a transition from a glassy to rubbery state. Testing Methods: ASTM D7426 Inflection Point, DSC (SSYS), ISO 11357
- Heat Deflection Temperature (HDT), (°C , °F): Also known as ‘deflection temperature under load,’ Heat Deflection Temperature (HDL) is the measure of a polymer's ability to bear a given load under elevated temperatures. When a material reaches its heat deflection temperature it will have a dramatic decrease in mechanical properties. HDT is not a melting point, which would be glass transition temperature (Tg), but is typically the most important for understanding the limits of a materials operating environment. Testing Methods: ASTM D648, ASTM D648 Method B, ISO 75
- Melt Flow Rate (MFR), ([g/10min]): Melt flow rate (MFR), also referred to as melt index test or melt flow index test, measures the mass of thermoplastic material flowing through a die while subjected to a load and temperature. This indirectly measures the molecular weight of plastics. A high MFR corresponds to low molecular weight while a low MFR corresponds to a high molecular weight. Testing Methods: ISO 1133
- Melt Volume Flow Rate (MVR), ([cm3/10min]): Melt volume flow rate (MVR) measures the volume of a thermoplastic material flowing through a die while subjected to a load and temperature. Testing Methods: ISO 1133
- Melting Point: The melting point is the temperature at which a material changes from a solid to a liquid state. This test helps inform a material’s working temperature.
- Peak Melt Temperature, (°C , °F): Peak melt temperature is the measure of the average melting temperature of the crystallites in a polymer. Testing Methods: ISO 11357
- Thermal Conductivity, (W/m*K BTU/(hr*ft*F)): One of the three methods of heat transfer, thermal conductivity indicates the ability of a material to conduct or transfer heat. It is determined by the amount of heat flow through a material. This has many application implications in energy efficiency, thermal management, safety, and material selection. Testing Methods: ASTM E1952

- Thermal Diffusivity, (mm2 /s, in^2/s): Thermal diffusivity is the rate at which temperature spreads through a material. This is defined as the ratio of thermal conductivity to the heat capacity of a material. This measures the ability of a material to conduct thermal energy relative to its ability to store thermal energy. Testing Methods: ASTM E1952
- UL Flammability: Ul flammability is a safety standard released by Underwriters Laboratories of the Unites States. It determines the flammability of plastic materials using metrics such as the ability of the material to extinguish or spread a flame after ignition and dripping behavior in response to a small open flame or radiant heat source. The flammability of a plastic is influenced by a variety of factors including, ease of ignition, flame spread, fire endurance, rate of heat release, ease of extinction, smoke evolution, and toxic gas generation. Testing Methods: ANSI/UL 746B
- Vicat Softening Temperature, (°C , °F): The Vicat softening temperature is the temperature at which a flat ended needle penetrates a material to the depth of 1 mm under a load. This value differs from heat deflection temperature (HDT) in that HDT tests plastics measure the deformation temperature rather than the softening temperature. Testing Methods: ASTM D1525, ISO 306
Electrical Properties
- Dielectric Constant: The dielectric constant of a material measures its ability to store electrical energy. Testing Methods: ASTM D150, ASTM D150-98
- Dielectric Strength, (V/mil): The dielectric strength of a material measures a materials breakdown resistance under an applied voltage. This indicates the material's effectiveness as an insulator. Testing Methods: ASTM D149-09
- Dissipation Factor (DF): Dissipation factor (DF), also known as the loss tangent, measures the dielectric losses in materials. It is referred to as the loss tangent because it is the ratio between the dissipated power to the energy stored. To test for this, an alternating current (AC) signal is passed through the material. The energy dissipated is measured and quantified as heat. Testing Methods: ASTM D150, ASTM D150-98
- Surface Resistance, (ohms): Surface resistance is defined as the ratio of the direct voltage applied to the current obtained from two electrodes placed on the surface of a material. Testing Methods: ASTM D257
- Volume Resistivity, (ohms-cm): Volume resistivity describes the ability of a material to resist the flow of electric current through a volume. Testing Methods: ASTM D257
Mechanical Properties
- Rockwell Hardness: The Rockwell Hardness test is a measurement of hardness based on the increase in depth of impressions as a load is applied. The term hardness is defined as the ability for a material to resist indentation and is a characteristic of a material rather than a physical property. Testing Methods: ASTM D785
- Specific Gravity: Specific gravity is defined as the ratio between the density of a material and that of a standard material. Testing Methods: ASTM D792, ASTM D257, ISO 1183
Tensile Properties
- Elongation, (%): Tensile elongation measures the elastic deformation and plastic deformation for a material and is expressed as the sum of those two values. This value is expressed as a percentage of the material's new length in terms of the original length. Testing Methods: ASTM D638
- Elongation at Break, (%): Elongation at break, also known as fracture strain, is used to figure out how long a material can stretch before it snaps, breaks, or fractures. The elongation of break shows the change between a material’s starting length and the distance it has stretched. It’s also great for understanding how much a material can deform before they’re unsafe or unusable. Testing Methods: ASTM D638
- Elongation at Yield, (%): Elongation at yield is testing to find the most deformation a material can undergo before its shape or size is permanently changed. Testing Methods: ASTM D638
- Elongation at Yield Point, (%): Elongation at yield is testing to find the most deformation a material can undergo before its shape or size is permanently changed. The yield point is the point before a material begins to stretch without a noticeable increase in load. Testing Methods: ISO 527-1
- Modulus, (GPa, ksi): Tensile modulus, or elastic modulus, measures the change in a materials volume or the how much the material is expected to deform under a load. It is defined as the ratio of its tensile stress to its strain. A high tensile modulus means the material is rigid and harder to strain. Testing Methods: ASTM D638, ISO 527-1
- Strength, (MPa, psi): Tensile strength describes how much load or pulling force a material can take across a specific area before it either permanently stretches or breaks. This is in contrast to compressive strength which describes how much pushing force a material can take. Testing Methods: ASTM D638
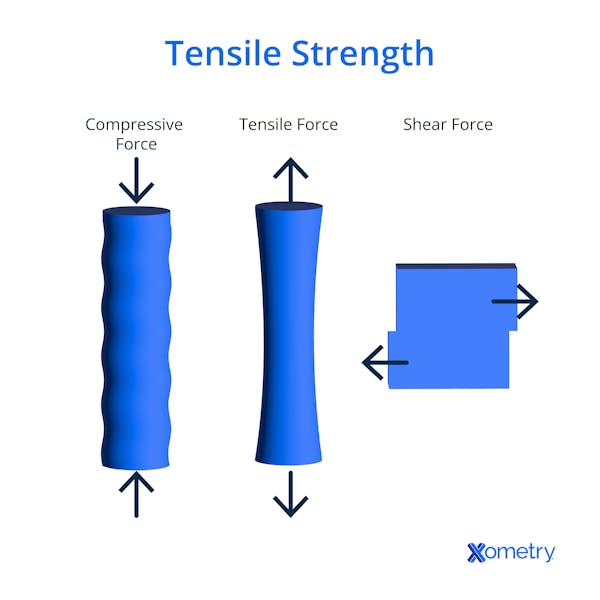
Tensile strength
- Strength at Break, (MPa, psi): Tensile strength at break is the measured tensile stress when a material sample finally breaks. Testing Methods: ASTM D638
- Ultimate Strength, (MPa, psi): Ultimate tensile strength is the maximum pulling stress a material can endure before it breaks under tensile load. Not all plastics will have a well-defined ultimate tensile strength. Testing Methods: ASTM D638
- Yield Strength, (MPa, psi): Tensile yield strength is defined as the moment when a material goes from an elastic deformation to plastic deformation. Elastic deformation allows the material to bounce back to its former shape after being put under stress. Reaching plastic deformation means that the material can no longer return to its original shape or form. Yield strength is visualized using a stress-strain curve. This curve is used to identify other material properties including elongation at yield, ultimate strength, and elongation and break. Testing Methods: ASTM D638
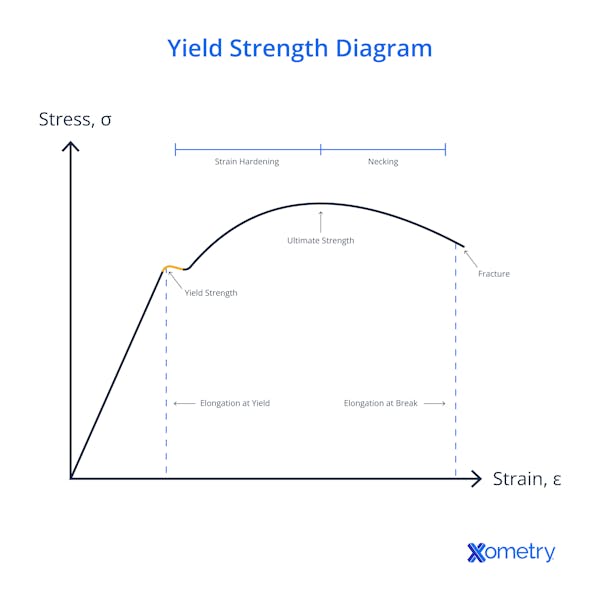
Diagram of yield strength
Flexural Properties
- Modulus, (GPa, ksi): Flexural modulus, also referred to as bending modulus, indicates a material's ability to bend by measuring its stiffness. To test this, the sample material is secured at opposing ends and a load is applied in the center of the material. The distance covered by the load is used to calculate the flexural modulus. This process is known as the three-point bend test. Testing Methods: ASTM D790
- Strength, (MPa, psi): Flexural strength is defined as the ability of a material to resist deformation while under a load. Testing Methods: ASTM D790
- Strain at Break, (%): Testing Methods: ASTM D790
- Ultimate Strength, (MPa, psi): Ultimate flexural strength is the stress required to break the material sample. Testing Methods: ASTM D790
Compression Properties
- Modulus, (GPa, ksi): Compression modulus, also referred to as bulk modulus, measures a materials decrease in volume due to an increase in pressure. To test this, a load is applied uniformly to a fixed volume of sample material that is constrained from shape changes other than compression. Testing Methods: ASTM D695
- Strength, (MPa, psi): Compressive strength describes how much load or pushing force a material can take across a specific area before it either permanently deforms or ruptures. This is in contrast to the more commonly measured tensile strength, which describes how much pulling force a material can endure. Testing Methods: ASTM D695
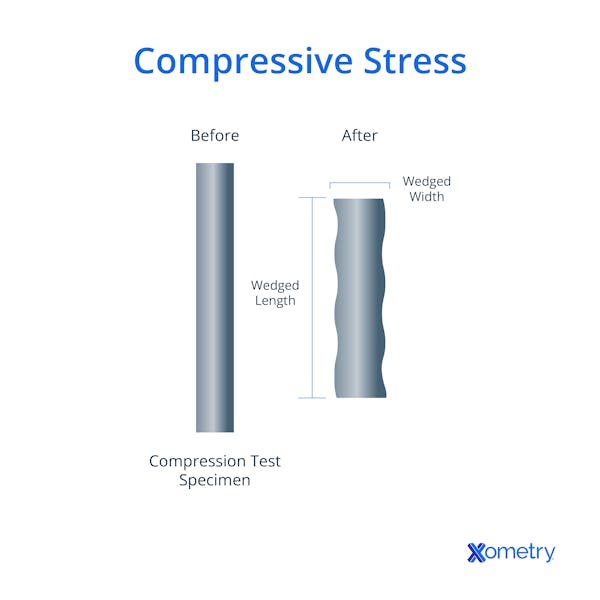
- Ultimate Strength, (MPa, psi): Ultimate compressive strength is the maximum pushing stress a material can endure before it ruptures under tensile load. Not all plastics will have a well-defined ultimate compressive strength. Testing Methods: ASTM D695
- Yield Strength, (MPa, psi): Compressive yield strength is defined as the moment when a material goes from an elastic deformation to plastic deformation. Elastic deformation allows the material to bounce back to its former shape after being put under stress. Reaching plastic deformation means that the material can no longer return to its original shape or form. Yield strength is visualized using a stress-strain curve. This curve is used to identify other material properties including compressive ultimate strength. Testing Methods: ASTM D695
Impact Properties
- Charpy Impact Test, notched, ([kC/m4]): The Charpy impact test is a way of determining the impact resistance of a material. This test is conducted by using a weighted hammer attached to a pendulum to impact a rectangular material sample. While similar to the IZOD impact test, Charpy impact tests have a different orientation, point of contact, and notch direction. The material is oriented horizontally and is supported on both ends. The weight strikes directly behind the test material’s notch while the notch faces away from the weighted hammer. A notch is machined into the sample to concentrate the stress from the impact. Notches on the Charpy impact test can be U shaped or V shaped, while notches on IZOD impact tests are exclusively V shaped. Testing Methods: ISO 179-1
- Charpy Impact Test, unnotched, ([kC/m4]): The Charpy impact test is a way of determining the impact resistance of a material. This test is conducted by using a weighted hammer attached to a pendulum to impact a rectangular material sample. While similar to the IZOD impact test, Charpy impact tests have a different orientation and point of contact. Testing Methods: ISO 179-1

Charpy Impact Test Diagram
- IZOD Impact Test, notched, (J/m, ft*lb/in): The IZOD impact test is a way of determining the impact resistance of a material. This test is conducted by using a weighted hammer attached to a pendulum to impact a rectangular material sample. While similar to the Charpy impact test, IZOD impact tests have a different orientation, point of contact, and notch direction. The material is oriented vertically and fixed at one end forming a cantilever. The weight strikes the test material above the notch while the notch is facing the weighted hammer. A notch is machined into the sample to concentrate the stress from the impact. Notches on the IZOD impact test are always V shaped, while the Charpy impact test can have V shaped or U shaped notches. Testing Methods: ASTM D256, ASTM D4812
- IZOD Impact Test, unnotched, (J/m, ft*lb/in): The IZOD impact test is a way of determining the impact resistance of a material. This test is conducted by using a weighted hammer attached to a pendulum to impact a rectangular material sample. While similar to the Charpy impact test, IZOD impact tests have a different orientation and point of contact. Testing Methods: ASTM D256, ASTM D4812
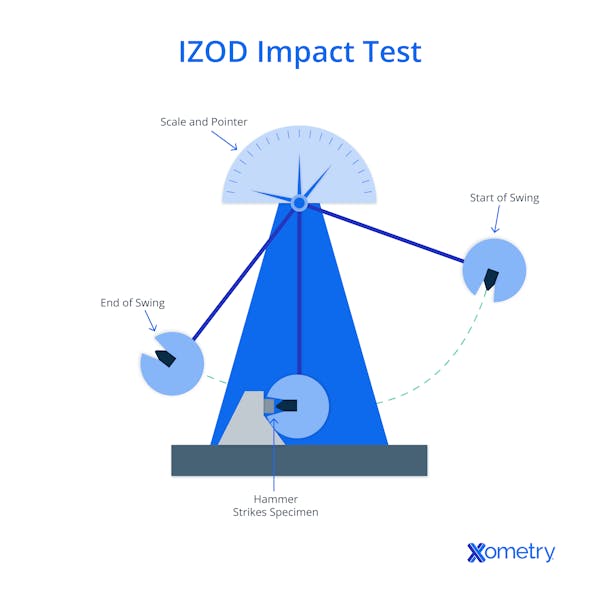
How the IZOD impact test works